Star Wars: Knights of the Old Republic II - The Sith Lords - Max Quests Glitchless Guide
v2.3: Female Jedi Guardian Route (Light Side)
Route created by Ninko.
First of all, major credit goes out to 30cents for his help with some route improvements and Sanjan for their work on the Any% Glitchless route.
This route defeats Darth Traya on Malachor V while also completing the Max amount of the Quests in a single run as fast as possible without the use of glitches. Timing begins upon clicking “PLAY” after character creation and ends on the last hit on Traya as the screen fades to black. A load-removal tool is available for LiveSplit thanks to glasnonck; times are sorted based on load-removed times, since load times vary significantly in this game, and saving is frequent. This guide will cover the character build for the run, as well as a detailed route.
If you have additional questions, you can check out the KotOR Speedrunning Discord. There’s a bunch of friendly folks there willing to answer your questions!
Table of Contents:
Glitchless Ruleset
All glitches are banned, with the exception of the following:
- Fast text (unavoidable without restarting the game frequently)
- Duration glitch (also unavoidable, and semirandom at this point in time, though it is less effective in this game than in KOTOR 1)
In addition, exploits that give infinite experience, credits, or alignment points are also banned.
Due to its glitchy nature, QUICKSAVE is banned as well. Manual and autosaves, however, are allowed.
No mods are allowed to be used (Yes, this also includes the restoration mod!)
General Tips
- If running on any monitor over 60 Hertz (hz), underclock it to 60hz exactly. If not done, your game will hang after combat and restrict you from moving. This is due to this game being made to suit a maximum of 60hz and to not be played exceeding 60 FPS.
- Unbind your quicksave key! You can do this by setting the Quicksave key (default F4) to the Quickload Key (default F5) then setting the Quickload key back to F5.
- Learn how to swap abilities easily. Shift +# swaps the ability. (e.g shift+1 swaps from Critical Strike to Flurry etc. Shift+4 swaps force powers)
- Watch someone’s PB video (if there is one) while going through the notes! This is very important to fundamentally understand the run and how it flows, and learn possible tricks to make your run much faster and smoother.
- Manual save a lot! The game tends to be very wonky, it can be prone to crashing in the worst moments, especially if you’re on a good run! You’ll figure out key points to save while you practice the run.
- Once you understand the fundamentals from these notes, make your own copy of the notes and modify them to your own use. These notes are made detailed for a new player, and once you become more experienced you will need less of these notes.
- Remember to have fun!
Character Build
Character Creation
We begin the game as a Jedi Guardian mainly to make use of the Force Jump ability, and its Strength for combat. A female character is chosen because instead of Handmaiden, which you attain as a male character, we get the Disciple. Having Handmaiden incurs extra cutscenes with Atris at the end of the game, thus resulting in a slower run.
Our main character only needs skill investment in Treat Injury (TI), as ‘Affect Mind’/’Dominate Mind’ are used for anything requiring persuasion.
Initial Attributes
- Strength - 18
- Dexterity - 14
- Constitution - 14
- Intelligence - 8
- Wisdom - 10
- Charisma - 8
Initial Skills
- Treat Injury - 4 (Pressing recommended will do this for you, as is the same for all level ups.)
Initial Feat - Weapon Focus: Melee
We will be focussing on melee attacks with a sword/lightsaber in this run, so we max out ‘Strength’ immediately, and get enough ‘Dexterity’ and ‘Constitution’ to help us survive. The final two points are put into ‘Wisdom’ for a slightly better chance at resisting Force Powers at the end of the game, as well as it gives us slightly more Force Points (FP).
Treat Injury (TI) will be our main skill, since there are no strict skill requirements we have to meet. Each level up we can select ‘Recommended’ in skills for ease and speed.
We choose ‘Weapon Focus: Melee’ for the attack boost before getting our lightsaber; we pick it over ‘Two-Weapon Fighting’ since this feat takes longer to select and character creation isn’t timed. This will in turn result in our first level up being faster than if we chose ‘Two-Weapon Fighting’ now.
Leveling Plan
| Level |
Feats |
Powers |
| 1 |
Weapon Focus: Melee |
— |
| 2 |
Two-Weapon Fighting |
Burst of Speed |
| 3 |
Weapon-Focus: Lightsaber |
Affect Mind |
| 4 |
— |
Force Valor |
| 5 |
Improved Two-Weapon Fighting |
Energy Resistance |
| 6 |
— |
Force Deflection |
| 7 |
Improved Critical Strike |
Dominate Mind |
| 8 |
— |
Battle Meditation |
| 9 |
Master Two-Weapon Fighting |
Knight Speed |
| 10 |
— |
Knight Valor |
| 11 |
Master Critical Strike |
Force Resistance |
| 12 |
— |
Force Redirection |
| 13 |
Weapon Specialization: Lightsaber |
Improved Energy Resistance |
| 14 |
— |
Improved Battle Meditation |
| 15 |
Toughness (Recommended) |
Master Speed |
You will notice attributes and skills aren’t listed here. This is because when we level up, all skills/attribute points will use the ‘Recommended’ option (Strength/Treat Injury respectively).
Our main combat plan is lots of Strength, ‘Master Two-Weapon Fighting’, ‘Master Critical Strike’, and ‘Knight Speed’ using dual lightsabers. This gives us attacks that will deal as much damage as possible; we want to hit as hard as possible, since enemies in the later parts of the game will have higher HP. Once we get the lightsaber form ‘Shien’ from Master Zez-Kai-Ell, we will switch to this form for the rest of the run.
Other notes:
Skill notes:
- We use TI to make our medpac use more efficient. And in turn it is the fastest way to select our skills
- Persuade isn’t used in this run as Affect Mind and Dominate Mind are sufficent for all of our needs of persuasion.
Feat notes:
- ‘Weapon Focus: Lightsaber’ is chosen since there aren’t other good feats at level 3, and it gives +1 to attack when we get our lightsaber later.
- ‘Critical Strike’ and ‘Two-Weapon Fighting’ are our main combat core.
- At level 14 we choose ‘Weapon Specialization: Lightsaber’ as this will add a +2 damage bonus to our hits and will help for the endgame.
- It is hit and miss whether we will reach Level 15 or not, but if so we recommend choosing ‘Toughness’ purely due to being able to click recommended. This gives us slightly higher VP but most importantly it is quick to select.
Force Power notes:
- ‘Burst of Speed’ is the most important power, giving us 100% increased movement speed. With no Save Teleports, this is an essential power for the run. Knight Speed also grants +1 attack per round, which is highly important due to our relatively low chance to hit. ‘Burst of Speed’ also gives us +2 Defense while active.
- If MC reaches level 15, Master Speed grants us +2 attacks per round while active.
- Duration Glitch in this game is not as effective as in KOTOR 1, so we will be using these Force Speed powers much more. We will generally take Kreia into our party as a second source of Force Points (FP) due to the Force Bond ability affecting MC and Kreia.
- ‘Force Valor’ is used to boost stats and saving throws for various combat sections in the game. Later this will be levelled up to ‘Knight Valor’.
- ‘Affect Mind’/’Dominate Mind’ is used in the following places:
i. ‘Affect Mind’ is required to persuade the receptionist in the Exchange Base to allow you through.
ii. ‘Dominate Mind’ persuades Captain Bostuco to leave his post during Onderon 1.
iii. It is required that we have ‘Dominate Mind’ in order to complete the ‘Lupo’s Advantage’ quest on Nar Shaddaa.
- ‘Energy Resistance’ is not particularly useful, but there aren’t any worthwhile Force Powers to get at level 5. This force power is mainly chosen as there isn’t any other worthwhile force powers to choose from during this level up.
- ‘Force Deflect’ is taken as it’s a nice defensive passive skill, and you frequently run through heavy amounts of ranged enemies during the run.
- ‘Battle Meditation’ is a nice filler, it lasts 20 seconds, and provides very good stat boosts for fights provided you have the spare force to use it. We can use ‘Battle Meditation’ to help Kreia fight the cleaning droid on Nar Shaddaa during the ‘Experiment in Delivery: Bonus Mission’.
- ‘Breath Control’ is attained for free during the Jek Jek Tarr section on Nar Shaddaa. It makes us immune to poison, but we don’t use it in this run at all. It could be helpful to use on Malachor V if you want to avoid getting poisoned running to Trayus Academy.
- ‘Force Barrier’ is taken at Level 14 as it is quick and easy. We don’t end up using this power in the run at all.
- ‘Force Redirection’ is the upgrade to ‘Force Deflect’ and is taken for its added bonuses, but also as a filler for a faster level up.
- ‘Improved Energy Resistance’/’Improved Battle Meditation’: These are chosen as quick options during their respective level ups, due to having to choose a force power each time we level up. These powers are not used in the run.
Level Up notes:
Level ups 2-8 will need to be used at the correct times as shown in the Detailed Route below.
- Level Up to 2: Peragus, Administration Console.
- Level Up to 3: Peragus, Final Run.
- Level Up to 4: Telos Citadel Station, before Ithorian Droid.
- Level Up to 5: Telos Citadel Station, after Escaped Criminals.
- Level Up to 6: Telos Citadel Station, quick heal during Mercenaries fight at Czerka.
- Level Up to 7: Dantooine, quick heal during fighting Matriarch.
- Level Up to 8: Dxun, quick heal during fighting Zakkeg.
- Level Up to 9: Dxun, before Sith Ambush.
Equipment Plan
One of the many special differences KOTOR 2 has compared to KOTOR 1 is that many of the drops/containers you loot are randomized. The base items listed below are all guaranteed items, but it is possible you may obtain items in your run that are more optimal to equip before getting the guaranteed items (or could possibly be better!).
Implant: Power Implant
- Bought on Nar Shaddaa from Geeda (1615 credits)
Since we don’t have enough Constitution to equip a Nerve Enhancement System, and only Sion and Traya use stunning force powers against us, we go for offensive items and this implant is the easiest guaranteed item we can access that gives us +2 STR.
Headgear: Targeting Visor
- Obtained from dead mercenary in the Enclave Ruins
The only guaranteed headgear we can obtain, this gives us a +1 to attack and +1 to reflex saves. If you find other better headgear, prioritize equipping those over this helmet.
Gloves: Sith Power Gauntlets
- Obtained from Sith Lord at Freedon Nadd’s Tomb
This is used for the +3 Strength; which gives us a lot of damage and accuracy.
Body: Jal Shey Neophyte Armor
- Obtained from Geeda on Nar Shaddaa (570 credits)
At the beginning, we only have easy access to the Mining Outfit that gives us +1 defense.
We use the Jal Shey Armor then for its defense and dexterity bonus.
Body 2: Ossus Keeper Robes
- Obtained as a reward from Queen Talia during Onderon 2.
We give Visas these robes for her Goto’s Yacht segment, in the hopes that it helps her stay alive while she destroys the turrets. We also have the option to equip them to MC afterwards allowing MC to have a bigger forcepool for the coming areas, plus we gain a better resistance against Sion/Traya’s force powers (+4 Wisdom, +4 Intelligence, +2 Charisma).
Beginners can opt to keep the Jal Shey Neophyte Armor, as it provides more defense for the late game.
Main Hand: Single Lightsaber
- Crafted by Bao-Dur after Dantooine
We use a single-handed Lightsaber for use with Critical Strikes after Dantooine. At Nar Shaddaa, we will be buying two crystals to upgrade it.
Crystal 1: Nextor
- Bought on Nar Shaddaa from Oondar (3580 credits)
Provides a high critical threat range, which makes our critical hits stronger. It also gives a nice +1 to our attack modifier.
Crystal 2: Opila
- Bought on Nar Shaddaa from Geeda (2831 credits)
Grants us the Keen effect, which gives us a 10% increased chance to crit. It also adds a flat +3 to damage, and is very cost effective.
Crystal 3: Pontite
- Obtained as a reward from Queen Talia during Onderon 2.
Giving us Damage Bonus +1-10 Cold and Charisma +2, this will replace Crystal, Nextor after the Onderon Palace.
Off-Hand: Single or Short Lightsaber
- Looted
We will upgrade this after Nar Shaddaa 1 and potentially again after Onderon 2, this replaced Freedon Nadd’s Short Lightsaber which was originally in the run.
Belt: None. Or the best belt you looted
- There are no good guaranteed belts we can purchase for an affordable price. See item prioritization below to see what you should look for in a belt.
Shield Slots: Energy Shield
- The Energy Shield is equipped to mitigate damage from blasters, which is primarily used at Peragus when walking through mines. There are a couple sections in this run where Energy Shields will be helpful for MC and other party members.
The majority of our equipment is attained in Nar Shaddaa. For the early game, we will make use of a pair of Vibroswords, though some exceptions can be made depending on the randomization the shops have.
Item Prioritization:
- Due to the RNG nature of loot and shops in this game, sometimes there are better items you might on your way through the early game. You’ll want to prioritize it roughly by:
- +Strength: Strength gives us more damage AND more accuracy, and therefore is much more beneficial to us overall than any other stat.
- +Damage (any type): More damage is great. Generally this will be in the form of +physical damage (e.g Gamorrean Gloves).
- +Attack: Gives us more chance of hitting, which is crucial early game since our weapons are weaker.
- +Wisdom: Gives us better saving throws for the endgame, where Nihilus, Sion, and Traya have the chance to use force powers against us.
- +Defense: Makes others less likely to hit us. A good stat to look out for since we tend to run through areas with large amounts of enemies.
Credit Route
We perform 8 shopping trips during the run. Most ‘Buy’ amounts are the total amount that you will end with in your inventory, make sure to take note of this. The trips are as follows:
- Samhan Dobo; Telos Station
The first shopping trip of the run will start with Samhan. Please note that at the end of the Telos Station shopping trip we MUST have at minimum 1525 credits to complete the ‘High Stakes’ quest.
In Samhans shop we will sell the following:
- 1x Parts (+55 credits)
- 2x Vibroblades (+208 credits)
- Droid Self-Sustaining Unit (+3300 credits)
This will bring our credit total somewhere between 4000 and 4300 credits.
We are allocating 1550 credits for the bare essentials, although we will usually spend a bit less than that here.
Next is to buy some essential items that will get us to Dantooine, credits are scarse with the tightness of this route so only buy what you need. We are only buying enough items here to end at the total amount given below:
(e.g. If you have 2 Strength stims and you need 4, only buy 2. This is true for all but the Ion Grenades which we will only buy the 2 of.)
- 2x Ion Grenades (-260 credits)
- 3x Frag Grenades (-240 credits)
- 1x Hyper Alacrity (-100 credits)
- 2x Hyper Stamina (-200 credits)
- 6x Alacrity (-300 credits)
- 5x Stamina (-250 credits)
- 4x Strength (-200 credits)
This will leave us at a credit total between 2250 and 2750.
- Dendis Dobo; Telos Station
MUST END WITH +1525 CREDITS!
From Dendis we only buy:
- 15-20 Medpacs <br>
This could be less or more, we just need to remain above 1525 credits after the trip!
It's recommended that you buy as many as you can!
- Adum Larp; Dantooine
For the second shopping trip of the run, we are going to stock up on some Medpacs and Stims to get us through to the next one. Plus the Battle stims that will take us through the rest of the run.
Firstly sell:
- Exchange Negotiator (+467 credits)
- Benok's Blaster (+660 credits)
And buy:
- 4x Advanced Medpacs (-320 credits)
- 6x Alacrity (-300 credits)
- 5x Strength (-250 credits)
- 4x Stamina (-200 credits)
- 11x Battle Stim (-1100 credits)
- Medpacs, if <10 buy enough to get to 20 total, if >20 don't buy any.
- 1B-8D; Onderon
During Onderon 1 we will come across 1B-8D in part of the quest ‘A Doctor’s Alibi’, we talk to this droid merchant for the quest and then once again in order to enter the shop screen with it. Here we will first of all buy 1 of our 4 needed HK parts for repairing HK-47:
- 1x HK Droid Processor (-359 credits)
We will also sell the Mandalorian Assault Rifle here as it will give us roughly 1000 more credits than any other merchant along the way in the rest of the run:
- Mandalorian Assault Rifle (+5472 credits)
- Kex; Dxun
After we are finished with Onderon 1 we will be back at the Mandalorian Ruins, it is here we can shop with Kex and buy some crucial items for the rest of the run. We will only need to purchase enough of these items to end at the total given below:
- 40 Advanced Medpacs (-3200GG credits)
- 1x Hyper Battle (-200 credits)
- 2x Hyper Strength (-200 credits)
- 15x Alacrity (~ -750 credits)
- 10x Stamina (~ -500 credits)
- 10x Strength (~ -500 credits)
- 13x Average Frag Mines (-3250 credits)
Since we sold the Mandalorian Assault Rifle during Onderon 1, we should have plenty of credits at this point and not have to worry about selling any more items for the rest of the run.
- Kodin; Nar Shaddaa
As part of the quest ‘Droid Retrieval’ we will have to talk to Kodin, at the end of this dialog we will be in the shop interface and we can buy our last HK part!
- HK Chassis (-1500 credits)
- Oondar; Nar Shaadaa
During our talks with Geeda and Oondar for the quest ‘Trade War: Bonus Mission’ we will buy the Nextor Crystal from Oondar for our lightsaber:
- Nextor Crystal (-3582 credits)
We won’t do this shop if we manage to loot a ‘Crystal, Nextor’ from the Crystal Cave on Dantooine.
- Geeda; Nar Shaadaa
Our last shopping trip! And our last talk with Geeda during the quest ‘Trade War: Bonus Mission’ and also partly completing ‘New Trade Routes: Bonus Mission’ Geedas shop will have an upgrade and give us the opportunity to buy the following items:
- Jal Shey Neophyte Armor (-570 credits)
- Opila Crystal (-2831 credits)
- Power Implant (-1615 credits)
At this point in the run, we should have almost all of our endgame items, the last two items will be looted during the Tomb of Freedon Nadd.
Most of our credits come from our completed quests as a part of the run anyway, and a select few guaranteed items. The credits route is a quite tight, but if followed correctly there should be no issues.
A lot of the quests we do we will end up with some sort of credit reward for completion, we tend to have just enough credits if following the route correctly.
A noteable quest that gives us a decent amount of credits would be ‘Sensor Search: Bonus Mission’ which when we find and return the Atmospheric Sensors to Saedhe we get 3000 credits.
The guaranteed items we sell are as follows:
- 1x Parts. Left over from Peragus, helps to fund our first shopping trip
- 2x Vibroblades. Obtained on Peragus, sold to help fund our stim needs.
- Droid Self-Sustaining Unit. Obtained from HK-50 on Peragus, this is a big chunk of credits for our shopping trip on Telos.
- Exchange Negotiator. Obtained from Luxa and is used to help fund our stim needs.
- Benok’s Blaster. Obtained at the same time as the Exchange Negotiator from Luxa and is also used to help fund our stim needs.
- Mandalorian Blaster Rifle. Obtained from Mandalore the second time we talk to him on Dxun. This needs to happen before we complete the ‘Battle Circle’ quest. If you don’t have this item to sell on Onderon, your run ends.
Alignment Route
Alignment in KotOR is a sliding scale from 0 to 100, initialized at 50; higher numbers are Light, lower numbers are dark. Shifts in alignment are determined by a matrix; every alignment-shifting action is classified as Light or Dark, and then assigned a level (either Low, Mid, or High). The player character (Exile) can either be aligned as Very Dark, Dark, Neutral, Light, or Very Light. The more opposed your alignment and the action’s classification, the more drastic your shift in alignment; for example, a Light-aligned character performing a High Dark action will have a large shift, while a Dark character performing a High Dark action will have a smaller shift.
- There is 83 total alignment shifts in the run to get us to 75 for the Sith Tomb on Korriban.
Here is the alignment route used in the run:
| Aligned |
Action |
Type |
LS/DS |
Delta |
New |
Total Shifts |
| Neutral |
Game Start |
– |
– |
– |
50 |
0 |
| Neutral |
Initial talk with Kreia |
Low Light |
1/0 |
1 |
51 |
1 |
| Neutral |
Agree to let Atton out of Force Cage |
Low Light |
1/0 |
1 |
52 |
2 |
| Neutral |
Talk with Atton, post T3-M4 solo |
Low Light |
1/0 |
1 |
53 |
3 |
| Neutral |
First encounter with HK-50 |
Low Light |
2/0 |
2 |
55 |
5 |
| Neutral |
Not shooting the Asteroids during escape |
Low Light |
2/0 |
2 |
57 |
7 |
| Light |
Long talk with Kreia on Ebon Hawk |
High Light |
8/0 |
8 |
65 |
15 |
| Light |
Talking to Atton before Telos |
Low Light |
1/0 |
1 |
66 |
16 |
| Light |
Help free the Sullustan from Mercenaries |
Mid Light |
3/0 |
3 |
69 |
19 |
| Light |
Bribe the Czerka Dock Employee |
Low Dark |
0/1 |
-1 |
68 |
20 |
| Light |
Bring the Ithorian Droid to Czerka |
Low Dark |
0/2 |
-2 |
66 |
22 |
| Light |
Complete High Stakes Quest (LS) |
Low Light |
1/0 |
1 |
67 |
23 |
| Light |
Bring Batono to Lt. Grenn |
Low Light |
1/0 |
1 |
68 |
24 |
| Light |
Help the TSF stop smuggling on Telos |
Mid Light |
2/0 |
2 |
70 |
26 |
| Light |
First encounter with Handmaiden |
Low Light |
1/0 |
1 |
71 |
27 |
| Light |
Reassuing Bao-Dur (somewhat) |
Low Light |
2/1 |
1 |
72 |
30 |
| Light |
Reassure T3-M4 |
Low Light |
1/0 |
1 |
73 |
31 |
| Light |
Lie to Jorran |
Mid Dark |
0/6 |
-6 |
67 |
37 |
| Light |
Bring Daraala the ‘Scavengers Will’ |
Mid Light |
2/0 |
2 |
69 |
39 |
| Light |
Help Suulru |
Mid Light |
3/0 |
3 |
72 |
42 |
| Light |
Dantooine (DS) Ending |
High Dark |
0/8 |
-8 |
64 |
50 |
| Light |
Spare Visas |
Mid Light |
3/0 |
3 |
67 |
53 |
| Light |
Save Kumus |
Low Light |
1/0 |
1 |
68 |
54 |
| Light |
Convince Panar to get rid of Gelesi |
Mid Dark |
0/6 |
-6 |
62 |
60 |
| Light |
Kill Captain Riiken |
Low Dark |
0/2 |
-2 |
60 |
62 |
| Light |
Agree to not harm civilians in cantina |
Low Light |
2/0 |
2 |
62 |
64 |
| Light |
Threaten Quello |
Low Dark |
0/1 |
-1 |
61 |
65 |
| Light |
Intervene to save a refugee |
Mid Light |
1/0 |
1 |
62 |
66 |
| Light |
Give beggar credits |
Mid Light |
1/0 |
1 |
63 |
67 |
| Light |
Destroy C9-T9 |
Low Dark |
0/1 |
-1 |
62 |
68 |
| Light |
Intervene to save a refugee |
Low Light |
1/0 |
1 |
63 |
69 |
| Light |
Reassure Ebon Hawk former owner |
Mid Light |
2/0 |
2 |
65 |
71 |
| Light |
Heal Geriel |
Low Light |
1/0 |
1 |
66 |
72 |
| Light |
Persuade Saquesh to free Adana |
Low Light |
1/0 |
1 |
67 |
73 |
| Light |
Saquesh will no longer pressure refugees |
Low Light |
1/0 |
1 |
68 |
74 |
| Light |
Help Aiida and Lootra reconnect |
Mid Light |
2/0 |
2 |
70 |
76 |
| Light |
Help Geeda establish trade routes |
Low Light |
1/0 |
1 |
71 |
77 |
| Light |
Lie to Geredi |
Low Dark |
0/1 |
-1 |
70 |
78 |
| Light |
Find a pilot for the Lunar Shadow Crew |
Low Light |
1/0 |
1 |
71 |
79 |
| Light |
Be nice to Visas |
High Light |
4/0 |
4 |
75 |
83 |
Alignment is not as important in this game, as we don’t use any equipment restricted by alignment. We do, however, stay on Light Side/Neutral in order to obtain Mira at Nar Shaddaa, as she is used for Goto’s ship segment to pass by the many deadly mines quickly without blowing them up, and to obtain deadly mines for Hanharr 2 later on at Malachor V.
We also try to get as many LSP as possible during the first half of Nar Shaddaa to get us to 75 Alignment so that we can enter the Sith Tomb on Korriban. The Sith Tomb wont let you enter unless you are at least at 25 or 75 alignment respectively.
Route Overview
The order in which we visit the planets is as follows:
Peragus -> Telos -> Dantooine -> Dxun/Onderon 1 -> Nar Shaddaa 1-> Korriban -> Dxun/Onderon 2 -> Nar Shaddaa 2 -> Dantooine -> Ravager -> Malachor V
The reasoning for the middle planets:
- We do Dantooine first, as there is little to no combat necessary until the end, and to obtain all the parts for our lightsaber as fast as possible.
- We do Dxun and Onderon 1 straight after since we have a lightsaber we can force jump, and to unlock Geeda’s guaranteed wares that require Dantooine and Onderon 1 to be completed.
- Nar Shaddaa is done next as per our alignment route we need to get to 75 or higher in order to enter the Sith Tomb on Korriban. Plus we want to unlock Geeda’s upgraded wares, which is crucial for our build.
- Next we head to Korriban to find Master Vash and complete the Secret Tomb, if Kreia does not allow you to enter the tomb here then your run ends.
- We go back for Dxun and Onderon 2 as part of the main quest, this only unlocks after completion of another planet, post Dxun/Onderon 1.
- Back to Nar Shaddaa! Finally we get to use the 12 of our 13 Frag Mines that we bought from Kex on Dxun! These are used in some quite combat intensive segments with Atton and Mira. Plus we have a whole bunch of side quests and main quests to complete here still.
Detailed Route
This section will describe all the actions needed to take for the Max Quests Glitchless run.
Since we have the option to side with Czerka or the Ithorians on Telos Station, and Czerka has one more quest to complete there, we have implemented two different Telos Routes for the run. Both will be their own seperate sub category and will need to be submitted to the leaderboards with the appropriate information. If completing the run on the Ithorians side, at the end of the run you will have 104 quests complete, versus Czerka being 105.
Notation:
> indicates a level up to be done} indicates an inventory/equipment action to be done\ indicates a swap to a different party member+ indicates solo mode= indicates a party change^ indicates weapon swap (Default key ‘H’)MC indicates the Main Character (aka you/The Exile)Shopping trips are highlighted in large code blocks
Conversation Notes:
If no conversation choices are specified, spamming will work (this chooses all 1 options).
| indicates a break in the conversation. You will have to talk to the person again.
-> indicates a secondary part to the conversation. This is different from | in that the conversation automatically initiates, rather than having to talk to the same person.
#xY indicates repeat that option Y times, as in our first conversation with Kreia during our Ebon Hawk to Telos segment.
#x- indicates the rest of this conversation uses that particular number, generally used to indicate conversation spam not using 1 (e.g Saedhe’s conversation: 2x-)
Jump to a Section:
Prologue
Character Creation
- Female Jedi Guardian
- Custom Character
- Str - 18, Dex - 14, Con - 14, Wis - 10
- TI - 4
- Feat - Weapon Focus: Melee Weapons
- Pick a name (or don’t)!
-
Hit Play!
- We can move T3 forward slightly during the fade in, but it is recommended not to move him too far as it will turn him around to facing the wrong direction when we gain control.
Ebon Hawk
- Spam 1 to start the prologue.
- Go to the first room on the left.
- Loot container for a computer spike.
- Use the console to open door to main hold.
- Bash open footlocker: (2-4 hits is optimal here).
- Loot the broken droid to the left of the footlocker.
- Use security on the door to the left of the broken droid.
- Loot Kreia’s ‘Body’ for the Locker Key.
- Use security on the door to the med bay.
- Use security on the Metal Box for medpacs.
- Heal MC.
- Head towards the Cargo Hold.
- Use Security to open the Cargo Hold.
- Open the locker on the right (this is why we looted Kreia’s corpse in the main hold.)
- Speak to 3C-FD.
- Put T3 at the Outer Garage door and go into solo mode. (
+ )
\ As 3C-FD, head back into the Main Hold and use the Security Console: 1,2,1,2,5- Head to the Cockpit and place 3C at the ‘Skip Prologue’.
\ As T3 open the workbench: 2- Breakdown 1 item, make 1 repair kit and exit the workbench.
\ As 3C go back to the Cockpit and skip the Prologue: 2
Peragus
Administration Level
- Mouse click through Kolto cutscene (Some of it is skippable).
- Head through the door in front of you and the door on the left.
- Use the Console: 3,1,3,3,3,6
- Starting the Medical Bay Murders quest, plus opening the door to the Morgue.
- Head into the morgue and loot the Corpse for a Plasma Torch.
- Kreia wakes up and speaks to you: 1x-
} Plasma Torch.- Bash the broken door.
- Loot the Corpse for a Vibroblade.
- Head straight through into the room with the corpse in front of the locker.
- Bash the locker.
- Keep heading through towards the administration console.
- Kreia accosts you: 1x-
- Bash the two footlockers in the next room and head straight to the administration console: 1x-
- Kreia accosts you: 1x-
> Perform your first level up.
- From here you will want to have Burst of Speed active as much as possible.
- Cast Burst of Speed straight after your level up and run to where Atton is in a cell.
- Kreia accosts you: Mouse spam
- Open the Door.
- Spam 1 through Atton Dialog until you have control of MC again.
- Use the Console: 2,2,2 -> 2,2,2,2
Fuel Depot - T3 Section
- Do not click your mouse until you can see T3 or your game will crash!
- Use Security on the Door.
- Move forward to trigger the cutscene: Mouse spam
- Use the console at the top of the ramp: 1,1,2,2,2
- Head through the now opened door to the Fuel Depot.
- Head straight and then left for the console: 3,1,2
- Watch T3 get zapped. :(((
- Atton speaks to you: 1x- -> 1x- (+1 LSP)
- Cast Burst of Speed and head into the Mining Tunnels.
Mining Tunnels
- Atton accosts you: 4
- Loot the Plasteel Cylinder for Mining Uniform.
- Loot the Broken Droid in the same room.
- Head through to the left and loot the next Broken Droid you come across for a Sonic Grenade.
- Cast Burst of Speed.
- Loot all corpses that are in the direct route through the module.
- We are looking for at least 1 Alacrity stim here otherwise the rest of the run to the space walk will be a bit slower. It is recommended while learning the route to loot the corpses but not stress about getting a stim.
- There is 2 corpses that are in direct line to the Console, depending on how you are for time you can go slightly out of your way for the 2nd corpse before the gas tunnel. Although it isn’t necessary.
- Don’t stress if you don’t get a stim, just keep moving!
- Use the console: 2,1 -> 2
- Continue through and loot the last corpse on your way.
- Exit the Mining Tunnels to the Fuel Depot, mouse spam until dialog.
Fuel Depot and Space Walk
- HK-50 accosts you: 5,1x9,2,2 (+2 LSP)
- Loot the maintenance officer corpse.
- This is only important if you didn’t get an alacrity in the Mining Tunnels, if you did get one you can just keep moving.
- Head south to the door and then turn right.
- Mouse spam through short cutscene.
- Run past the MK2 Mining Droids and turn right.
- Go through the door on the left to the Maintenance Station: 6
- This console will explode without hitting it, unlike the next one we destroy.
- Run past the Floating Mines and loot the Storage Locker for the Space Suit.
- Exit for the space walk.
- Run until Atton accosts you: 1x-
- Watch the Harbinger docking cutscene.
- Continue to the Dormitories.
Dormitories
- Note: If you don’t already have 1 Alacrity stim here, loot the last corpse in the big room before the room with the 3 corpses for more of a chance to loot one.
- Click on the door, while the door is opening cast Burst of Speed.
- Run your way through to the last room where the 3 corpses are.
- Loot the 3 corpses and use the Turbolift Console: 3
- This console requires us to actually hit it to destroy it.
- In a proper run we want to have at least 1 Alacrity stim in our inventory at this point. Otherwise the final run to the Ebon Hawk after the Harbinger will be slow.
- It is recommended while learning this route that you don’t focus on this and just continue regardless.
- You do not have to re-cast Burst of Speed here.
- Head through the now opened door.
- Run forward slightly, Kreia accosts you: 3 -> 1
\
- Cast Burst of Speed and run towards the administration console.
- A short cutscene triggers, this will auto swap us back to MC.
- Sometimes MC can get stuck on Mining Droid, yet Kreia will get through, this will throw the party swaps off a bit so be prepared for anything.
- Continue towards administration console where Atton is.
- Atton accosts you: 1x-
- HK-50 accosts the party: 1,1,4
- We used to do 3,4 as it was faster, this 1,1,4 completes Medical Bay Murders.
- Using MC and Kreia, throw 1x Sonic Grenade and 1x Ion Grenade at HK-50.
+ \ \
- Cast Burst of Speed and run to entrance to the Harbinger Command Deck
- Do not enter The Harbinger you have looted the HK-50.
\ Loot HK-50 \ \- Enter Harbinger.
Harbinger
+ Select Bash on the door to your left. \ \- Run to the right, open the door and cast Burst of Speed.
- Some dialog will trigger.
- Select Bash on the next door.
\ \
- Run to the Navicomputer: 1,1,2
\
- Follow the path through 2 doors to enter Harbinger Crew Quarters.
+ Run straight ahead until MC pauses to look at old room.- Kreia accosts you: 3
- Cast Burst of Speed and run your way through to Harbinger Engine Deck.
- Atton has a bad feeling about this: 1x-
- Run through the next door, then straight forward.
- Cutscene introducing Sion plays.
- Kreia runs through and door closes behind her.
- Once back in control of MC, cast Burst of Speed, turn 180° and bash the door.
- Bash the footlocker for a Vibroblade.
- Use the Engine Maintenance Console: 1x-
- Exit out of the room you are in and head to the left; follow the path.
- Cast Burst of Speed before using the next console.
- Click on the Main Ion Engine Control console: 1 -> 1
- Continue towards the Fuel Depot; Atton accosts you: 1
- Enjoy the long cutscene with Kreia and Sion.
- Atton accosts you: 4
- Cast Burst of Speed and exit to Fuel Depot.
Fuel Depot - MC Section
+ Run forward, Atton / T3 accost you: 3,1} Equip Mining Uniform, Energy Shield- Loot the Concealed Stash for the Hangar 25 Control Conduit.
- Activate Energy Shield.
- Run through the 3 mines before accessing the Emergency Field Station. Heal as necessary.
- It is good practice to activate your Alacrity stim, if you have one, right after the 3rd mine.
- Emergency Field Station: 1,1
- Run up the ramp, turn right and head into the Hangar Bay.
- Cast Burst of Speed and run through to the ramp where we were as T3 earlier.
- Activate Energy Shield (before the fade to black).
- Atton accosts you about the Hangar door: 1x-
- Cast Burst of Speed.
- If you used an Alacrity stim in the fuel depot you should not have to re-cast Burst of Speed again.
- Run up the ramp and access the Hangar Control Console: 1x5,2
Final Peragus run
This is where the fun begins!
- Run down the ramp and to the right through the now opened Hangar door, then take the first door to the left.
- Now we are going to be running through 6 mines which can deal 7 or 15 damage to us. Make sure to heal with medpacs and use your new level up when you health gets low!
> Once through all the mines we will head through the door and access the Decontamination Console.- Decontamination Console: 3
- Run through the newly opened door and bash the next door you come across.
- Open the next door and run to the Ebon Hawk ramp: 1
- Kill all the Sith Troopers in the Turret minigame, after it ends spam 1.
Ebon Hawk to Telos
- Immediate dialog cutscene after the load screen: 6,2 -> 4,3,3 (+1 LSP -> +1 LSP)
- Cast Burst of speed, turn around and run through to the right to where Kreia resides on the Ebon Hawk.
- Now we have quite a lengthy conversation with Kreia so it is a good idea when learning to make a save here just incase you make a mistake, this will give us +8 LSP, if not done correctly you will not be able to finish Korriban.
- Speak to Kreia: 2x7,1,3,1x10,4,3,2,1x6,2,1 (+8 LSP)
- Now run back to the Cockpit and speak to Atton: 1x- (+1 LSP)
- Use the Galaxy Map and select Telos. (1 left)
Telos
- Telos is the reason our run is named ‘Max Quests’ instead of ‘All Quests’, due to there being the Czerka vs Ithorian routes, here you will have the option to complete either of the two routes. The Czerka Route completes 1 (ONE) extra quest compared to the Ithorian Route, thus your run will end with a total of 105 completed quests, where the Ithorian route will end with 104.
Jump To:
Czerka Route
Ithorian Route
Czerka Route
Telos Citadel Station
- Lieutenant Grenn accosts you: 1,1,1
- Handmaiden steals the Ebon Hawk cutscene.
- Grenn speaks to you in jail: 1
- False Batu Rem enters the room: 1x-
- Kill False Batu Rem.
- Try and position Atton behind him for sneak attack hits.
- Grenn comes in alarmed: 1x-
- MC and party are moved to house arrest in 082 East.
- Mouse spam, Grenn shakes his head: 2
- This tells Grenn to ‘Get Out’.
- Atton accosts you: 2,1
- This lets us ‘rest’ for the first time.
- You will get 2 calls on the Communication Console, cast Burst of Speed when in control of MC for the first call.
- Communication Console: 2,1
- This is the same for both calls.
- Mouse spam through Kreia/Atton dialog.
- Grenn comes back in: 1x- -> 4
- Cast Burst of Speed and exit ‘Apartment Complex C.’
- Moza accosts you: 1x-
- Run across to the Apartment Complex A door.
+
- Go into the A1 apartment and speak to Harra: 2,1x4,2
\ \
- Run Kreia to the Information Terminal: 3
- Enter Czerka Corporation, B4-D4 accosts you: 3
+ Cast Burst of Speed, run and speak to Jana Lorso: 1x- \ \- Exit to 082 East and proceed to run to 082 West.
\ Cast Burst of Speed: Transit back to 082 East: 2,1- Run through into Entertainment Module 081.
- Turn left and open the module door.
- Put Kreia near Samhan.
+ \ \
- The Party Member swaps can be the other way around sometimes. Keep note that we will be swapping between Kreia and MC here.
- Run MC to TSF.
- Thugs accost you: 1,1,2,1
- Access the Information Terminal: 3
- Speak to the TSF Droid: 1x- -> 4
- Loot all the lockers then speak to Grenn: 1x6 | 1x16,2
\
- Speak to Samhan: 1
Sell:
- 1x Parts
- 2x Vibroblades
- Droid Self-Sustaining Unit
Buy:
- 2x Ion Grenades
- 3x Frag Grenades
- 1x Hyper Alacrity
- 2x Hyper Stamina
- 6x Alacrity
- 5x Stamina
- 4x Strength
Buy:
- As many Medpacs as you can!
- Make sure to remain above 1525 credits!
\ Enter Dock Module 126.- Speak to the Ithorian: 1,1
+ \ \
- Swapping between Kreia and MC.
- Remember the Party Swaps can reverse.
- Access Information Terminal: 2
- Run to Czerka Docking Bay speak to the 2 workers there. 1x- | 1x-
+ \
> } Equip 2 Vibroswords, Plasma Torch and Energy Shield- Enter Docking Bay 2 via the Airlock Terminal.
- Make Kreia cast Burst of Speed, cast Force Valor as MC.
- Defeat the 5 Thugs, Ithorian accosts you: 1
- Speak to the Ithorian Droid: 2,2
- To take the Ithorian Droid to Czerka.
- Jana thanks you and then asks you to do another task: 1,1,1,1
\ Cast Burst of Speed. \ \- Run backwards to trigger the escaped criminals: 1x-
- Speak to Jana Lorso about Batono: 1x-
> Run to Information Terminal and transit to Entertainment Module 081: 2,2+ \ \ Run Kreia to Samhan, cast Burst of Speed. \
- Note if party swaps are reversed.
- Run MC to Grenn.
\ \
- Speak to Samhan: 1,2,2,1,3,1,1,1,1,3
\
- Speak to grenn: 1,1,1
\
- Run Atton into the Cantina.
\ \ Cast Burst of Speed.- Speak to Luxa: 1,1,1,2,2,3
- Exit Cantina as MC, transit to 082 West: 2,3
+ Run into the Medical Facility and up to the Communication Terminal: 1 \- Transit to 082 East: 2,3
= Remove Kreia and Atton from your party.- Head to apartment B3.
- Cast Burst of Speed.
- Wait inside the apartment for the Bounty Hunters: 1,1 -> 1
- Cast Force Valor and kill the two Bounty Hunters.
- Cast Burst of Speed, transit back to Entertainment Module 081: 2,2
- Enter the Cantina and speak to Luxa: 1,1,1,2
- Exit the Cantina, cast Burst of Speed and transit to 082 East: 2,2
= Add Kreia and Atton back to your party.+ Cast Burst of Speed.- Head to apartment B2 and speak to Opo Chano: 2,1,2,1
\ Transit to Entertainment Module 081: 2,2- Enter the Cantina
\ \
- Speak to Luxa: 1x-
- Exit the Cantina, cast Burst of Speed and transit to 082 East: 2,2
- Run toward Exchange;
- If you run towards the light on the wall and hug the wall for 1 second you can skip some dialog with Kreia about Exchange. Image below.
- Speak to the Bouncer: 1
- Enter Exchange.
\
- Kreia casts Burst of Speed.
\ \
- Party swaps may be reversed.
- Make sure not to trigger the Receptionist as Kreia.
- The Receptionist accosts you: 1x-
- Continue through towards the room where Benok is. Before entering we will use our first Psuedo-Stim set, Minus Battle Stims as we get those on Dantooine.
- Cast Force Valor and open the door to the next room. Press 5 to initiate the fight.
- Kill everyone
^ bash the next door with the Plasma Torch. ^
- Speak to the Gamorrean and defeat the two droids, Loppak Slusk accosts you: 1x-
- Kill Luxa and her Gamorrean body guards, Loppak Slusk accosts you: 1x-
- Kill Loppak Slusk and the destroy the turrets, Atton accosts you: 1x-
- Loot Luxa’s remains for Exchange Negotiator.
- Loot Benok’s remains on your way out of the Exchange building.
- Cast Burst of Speed before exiting the module.
- Continue through the load zone to 082 West.
+ \
- Cast Burst of Speed, position Kreia by the Information Terminal.
\ \
- Enter the Ithorian Compound, Greeter accosts you: 1
- Run and speak to Chodo about Batono: 1x-
\
- Access the Information Terminal: 2,2
- Enter the cantina.
+ \ \
- Speak to Dotton Het: 1x-
- After the transition, we will be speaking to Harra: 2,1
- This completes the High Stakes quest.
- Cast Burst of Speed.
- Open the door to apartment C1 to speak to Batono: 1x-
\ \
- To trigger the dialog with the Thugs you must cross the entrance/exit to the C Apartments complex.
- Thugs accost you: 2
- Defeat the two thugs.
- We will now be teleported to Lt. Grenn: 1x-
- Finish the Bounty Quests with Lt. Grenn: 1x-
+ \ \ \
- Cast Burst of Speed.
- Run to Samhan to finish the Smuggling quest: 1x-
- Once back at TSF, cast Burst of Speed and head to the Information Terminal to transit to 082 East: 2,2
- Run over to the Czerka Entrance.
\
- Cast Burst of Speed.
\ \
= Remove Kreia and Atton from party.- Enter Czerka and immediately pause.
- Activate Pseudo-Stim set -Battle Stim, activate Energy Shield.
- Run straight through to where Jana Lorso is, mouse spam through dialog when it pops up, and proceed to attack the 3 mercenaries nearest to Lorso.
- Defeat the far-right mercenary last as he has the best Defense.
- You can use your level up here to heal as necessary.
- Keep MC healed with Medpacs where possible.
- Try to get the 3 Mercenaries to follow you into a corner so you can avoid being blasted by the ranged Droids and Mercenaries.
- Lorso accosts you: 1,1
- Defeat the ranged Droids and Mercenaries that can see you when you are at Lorso’s desk, then speak to her.
- Jana Lorso: 1,1
- Proceed to exit Czerka to 082 East.
- Cast Burst of speed and access the Information Terminal to transit to Dock Module 126: 2,1
- Run down to Bay 3 and speak to the Duros: 1
- Access the Airlock Terminal: 1
- Run to the back of the Shuttle to leave Citadel Station: 1
- Mouse click spam through cutscene with Grenn and Admiral Cede.
Jump to Restoration Zone
Ithorian Route
Telos Citadel Station
- Lieutenant Grenn accosts you: 1,1,1
- Handmaiden steals the Ebon Hawk cutscene.
- Grenn speaks to you in jail: 1x-
- False Batu Rem enters the room: 1x-
- Kill False Batu Rem.
- Try and position Atton behind him for sneak attack hits.
- Grenn comes in alarmed: 1x-
- MC and party are moved to house arrest in 082 East.
- Mouse spam, Grenn shakes his head: 2
- This tells Grenn to ‘Get Out’.
- Atton accosts you: 2,1
- This lets us ‘rest’ for the first time.
- You will get 2 calls on the Communication Console, cast Burst of Speed when in control of MC for the first call.
- Communication Console: 2,1
- This is the same for both calls.
- Mouse spam through Kreia/Atton dialog.
- Grenn comes back in: 1x- -> 4
- Cast Burst of Speed and exit ‘Apartment Complex C.’
- Moza accosts you: 1x-
- Run across to the Apartment Complex A door.
+
- Go into the A1 apartment and speak to Harra: 2,1x4,2
\ \
- Run Kreia to the Information Terminal: 3
- Run to 082 West.
+ Cast Burst of Speed, position Kreia by the Information Terminal. \ \
- We will be swapping to Kreia after talking to Chodo
- Open door to Ithorian Compound.
- Greeter accosts you: 1
- Run and speak to Chodo Habat: 1x-
\
- Use Information Terminal: 2,1
- Run through into Entertainment Module 081.
- Turn left and open the module door.
- Put Kreia near Samhan.
+ \ \
- The Party Member swaps can be the other way around sometimes. Keep note that we will be swapping between Kreia and MC here.
- Run MC to TSF.
- Thugs accost you: 1,1,2,1
- Access the Information Terminal: 3
- Speak to the TSF Droid: 1x- -> 4
- Loot all the lockers then speak to Grenn: 1x6 | 1x16,2
\
- Speak to Samhan: 1
Sell:
- 1x Parts
- 2x Vibroblades
- Droid Self-Sustaining Unit
Buy:
- 2x Ion Grenades
- 3x Frag Grenades
- 1x Hyper Alacrity
- 2x Hyper Stamina
- 6x Alacrity
- 5x Stamina
- 4x Strength
Buy:
- 30-35 Medpacs
- This will more than likely be a lot less, making sure to remain above 1525 credits.
\ Enter Dock Module 126.- Czerka Twi’lek Accosts you: 1x-
- Run MC to the Information Terminal.
+ \ \
- Swapping between Kreia and MC.
- Run to Czerka Docking Bay speak to the 2 workers there. 1x- | 1x-
\
- Use the information terminal to go to Czerka: 1,3
- B4-D4 talks to you as you enter Czerka: 3
+ \
- Run Kreia to Jana Lorso
- Jana lets the criminals go: 1
- Speak to Jana Lorso about Batono: 2,1x-
- Cast Burst of Speed.
\ \
- Exit Czerka back to 082 East, use Information Terminal to transit back to Dock Module 126: 2,1
> } Equip 2 Vibroswords, Plasma Torch and Energy Shield- Speak to the Ithorian and enter Docking Bay 2 via the terminal.
- Make Kreia cast Burst of Speed, cast Force Valor as MC.
- Defeat the 5 Thugs and speak to the Ithorian Droid to transit back to the Ithorian Compound speaking to Chodo Habat.
- Chodo thanks you: 1x-
- Speak to Chodo about Batono: 1x-
> Cast Burst of Speed and transit to Entertainment Module 081: 2,2+ \ \ \ \- Run Kreia to Samhan.
\ \
- Run MC to Grenn.
\
- Speak to Samhan: 1,2,2,1,3,1,1,1,1,3
\ \
- Speak to grenn: 1,1,1
\ \
- Run Atton into the Cantina.
- Speak to Luxa: 1x-
\ \
- Exit Cantina as MC, transit to 082 East: 2,2
- Run towards the Exchange;
- If you run towards the light on the wall and hug the wall for 1 second you can skip some dialog with Kreia about Exchange. Image below.
- Speak to the Bouncer: 1x-
- Enter Exchange.
\ \
- Kreia casts Burst of Speed.
\
- Party swaps may be reversed.
- Make sure not to do this next part as Kreia.
- The Receptionist accosts you: 1x-
- Continue through towards the room where Benok is. Before entering we will use our first Psuedo-Stim set, Minus Battle Stims as we get those on Dantooine.
- Cast Force Valor and open the door to the next room. Press 6 to initiate the fight.
- Kill everyone
^ bash the next door with the Plasma Torch. ^
- Speak to the Gamorrean and defeat the two droids.
- Kill Luxa and her Gamorrean body guards and then loot Luxa’s remains.
- Loot Benok’s remains on your way out of the Exchange building.
- Cast Burst of Speed before exiting the module.
- Continue back through the loading zone to 082 West.
+ \
- Cast Burst of Speed, position Kreia by the Information Terminal.
\ \
- Run and speak to Chodo: 1x-
\
- Access the Information Terminal: 2,2
- Enter the cantina.
+ \ \
- Speak to Corrun Falt: 1x-
- Speak to Dotton Het: 1x-
- After the transition, we will be speaking to Harra: 2,1
- This completes the High Stakes quest.
- Cast Burst of Speed.
- Head towards appartment B2 where Opo Chano is.
- Open the door to B2 to get the Droid Credentials from Opo Chano: 1,2,2,2,2
\
- Cast Burst of Speed.
- Open the door to apartment C1 to speak to Batono: 1x-
\ \
- To trigger the dialog with the Thugs you must cross the entrance/exit to the C Apartments complex.
- Thugs accost you: 2
- Defeat the two thugs.
- We will now be teleported to Lt. Grenn: 1x-
- Finish the Bounty Quests with Lt. Grenn: 1x-
+ \ \ \
- Cast Burst of Speed.
- Run to Samhan to finish the Smuggling quest: 1x-
- Once back at TSF, head to the Information Terminal and transit to 082 East: 2,2
- Enter Czerka, speak to B4-D4: 2,1,1
- 1x- until we gain control of B4-D4.
- Head to Czerka with the Information Terminal: 2,3
- Enter Czerka and speak to Jana Lorso: 1x-
- Enter the Czerka Mainframe, T1-N1 accosts you: 1x-
- Continue to mouse click to skip some dialog as the cutscene plays with T1-N1 leaving the mainframe.
- Click on the Mainframe Console: 1x-
- Exit Czerka, use the Terminal to fast travel: 2,3
- Speak with Chodo: 1x- | 1x-
> Cast Burst of Speed and head to the Information Terminal to transit to Dock Module 126: 2,1- Moza contacts you, Czerka’s Mercenaries are attacking the Ithorians: 1x-
- Speak to the Ithorian to open Docking Bay 2 door: 1
- Use the console twice to open the airlock: 1 | 1
- Run to the back of the Shuttle to leave Citadel Station: 1
- Mouse click spam through cutscene with Grenn and Admiral Cede.
Restoration Zone
-
This section, up until the Polar Plateau, is the same as the Any% - Glitchless route. If you already know that route it will help here, if not the description is below.
- 1x- -> 1x-
= Add Kreia to Party. + Cast Burst of Speed.
- Head through the module in the most direct route possible.
- Re-cast Burst of Speed as Kreia after the 3rd dialog trigger with Bao-Dur.
Czerka Site
+ \ Kreia casts Burst of Speed. \ \
- Party swaps can be reversed.
- Activate Psuedo-Stim set -Battle Stim.
- Run past the Twi’lek, cast Force Valor as the screen fades to black, start the fight: 4
- Here it is quickest to kill the non shielded enemies immediately, and try to get the two shielded ones next to each other. Throw Ion Grenades, keeping 3 at minimum, to defeat the shielded enemies. Afterwards place Bao-Dur and Kreia away from the fight so they are out of combat. It is essential that both of them stay alive or we will be stuck trying to defeat enemies here.
- Head up the ramp and destroy the two turrets and kill the two enemies.
\
- Cast Burst of Speed.
\ \
- Wait until combat ends, Swords will drop, and click on the console.
- Don’t spam until you see the cursor disappear else you have a high chance of skipping the cutscene which is considered a bug and makes your run invalid!
+ Run MC into the Military Base.
Military Base
- This is one of the most difficult segments, Bao-Dur has a lot of chances to get stunned which can lose us a lot of time. We just have to make it through as quickly as possible, if you get stunned try your best to keep him healed and keep his shield active. Heal with medpacs as necessary.
- If you are still learning the route, it is recommended to make a manual save at the beginning.
} + Unequip Plasma Torch from MC \} Equip Energy Shield to Kreia \} Equip Plasma Torch, Mining Uniform and Energy Shield to Bao-Dur.- Activate 1x Alacrity and 1x Stamina stim.
- Heal Bao-Dur with Medpacs now if he has low HP.
- Select Bash on the Force Field, this will trigger a cutscene showing that Bao-Dur can bash these Force Fields.
- After the cutscene, activate Bao-Dur’s Energy Shield,
\ move MC into the left corner. \ \
- Head through the Military Base until the Hangar where the shuttle is, after bashing the Force Field to the shuttle there is a cutscene that plays, IMMEDIATELY pause (with spacebar) after and swap back to Bao-Dur.
\ \- Continue to the next Force Field, bash it open.
- Run Bao-Dur half way towards the console.
+
- We turn solo mode off here so that MC and Kreia can teleport to Bao-Dur.
- Access the console to deactivate the gas vents: 1,1
- Activate Energy Shield
+ Solo mode once party members are in room. \ \ \- Bash open the 2 doors with the Plasma Torch and continue through the base.
- In the next room you will see a Twi’lek, stick close to the left wall when going around the corner to dodge the trigger. (If you hit the trigger: 1)
- Continue through to the room with the console and 3 droids.
- Access the console to destroy the droid charging stations and proceed to the Reactor.
- Once you have opened the last Force Field:
} Unequip Plasma Torch, Mining Uniform and Energy Shield \ \} Equip Plasma Torch to Kreia \- Activate the reactor with the console.
\
- Cast Burst of Speed.
\
- Activate Energy Shield
- Run through to the room with the 3 droids, go in to the right and bash open the door.
- Loot both containers in here, cast Burst of Speed.
} Unequip Plasma Torch \ \} Equip Plasma Torch to MC- Head into the room straight ahead, unlock Hangar Doors with console: 1,1
- Defeat the Tank Droid by throwing Ion Grenades at it.
- If Ion Grenades don’t defeat the Tank Droid, use the Plasma Torch and perform default Attacks until it is defeated.
- Run to back of Shuttle to head to the Polar Plateau.
- Mouse click spam through HK-50 cutscene.
Polar Plateau
This section is different from any% glitchless route!
- Mouse click through to HK-50 dialog, end dialog: 4
- Immediately pause (Spacebar).
- Pseudo-stim set -Battle stim.
- Cast Force Valor.
- Kreia cast Burst of Speed.
- Kill middle HK-50 and loot for HK Part #2.
- Run and enter the Polar Academy.
Polar Academy
- Handmaiden talks to you: 2
- On legacy client/version (not steam or GOG) you will need to do ‘1,3’, since the option above softlocks you.
- Mouse spam through Kreia/Atton dialog.
- Atris talks to you: 5,1,6,4
- Once Atris door closes, cast Burst of Speed and head to the prison room: 1,7,1x- -> 1x5
- When party selection is prompted, take no one.
- Head towards the Ebon Hawk, T3 accosts you: 1x- -> 1
- Cast Burst of Speed, enter the Ebon Hawk: 1
Ebon Hawk
- T3 hacked Atris’ files: 1x-
- Council Cutscene: 1x- -> Mouse spam
- 1 spam through the rest of the cutscenes.
- Cast Burst of Speed, run to the cockpit and speak to Atton: 2,2,1,2,1
- If you have accidentally spoken to Atton at any point prior to this conversation, the dialog options may differ.
- Exit the Pazaak Menu, use the Galaxy Map and select Dantooine. (1 left)
- Dantooine is an instant travel.
Dantooine
Khoonda
- Exit Ebon Hawk and take Kreia in your party.
- Dillan accosts you: 5
- Run into Khoonda.
- Mouse click through short dialog cutscene.
+
- Head through the right door.
- Speak to Suurlu: 1x-
- Head straight through 2 doors.
- Speak to Administrator Adare: 1x6,5
- Speak to Berun: 4,1,1,1,5
- Go in the room to the merchant Adum Larp: 1,1
Sell:
- Exchange Negotiator
- Benoks Blaster
Buy:
- 4x Advanced Medpacs
- 6x Alacrity
- 5x Strength
- 4x Stamina
- 11x Battle Stim
If you have <10 Medpacs, buy enough to get to 20. If >20 don't buy any.
- Go speak to Zherron: 1,2,1,5,5
\
- Exit to Khoonda Plains.
- Cast Burst of Speed and head towards Enclave Courtyard.
+ \ Cast Burst of Speed \
- Running controlling Kreia.
- Speak to Daraala: 1,2,4,2
- Head towards enclave Sublevel.
- Salvagers accost you: 1x-
\
- MC teleported in front of Kreia.
- MC only teleports if left at the load zone.
- Enter Enclave Sublevel.
Enclave Sublevel
- If you follow the image below, you can skip the triggers that spawn Gerevick at the entrance/exit.

+ ^
- Swapping to the Plasma Torch,
} equip it now if it was automatically removed.
- Cast Burst of Speed and activate 1x Alacrity Stim.
- Head through the right corridor, loot the first Salvager Corpse on your way to Disciple.
- Bash open the door to Disciple
- Disciple talks to you: 1,5,5,1
= Remove Disciple from your party when prompted.- Loot mercenary datapad and leave the room to your right.
- Opposite direction of which you came.
- Loot second corpse: 2
- This corpse is in a room through in open door.
- Continue to the door that Jorran is behind.
- Let Jorran out: 1,3
- Loot his corpse when he dies.
- Leave the Enclave Sublevel.
- If Gerevick is waiting for you: 1x-
Saving Vrook
= Add Kreia to Party. \- Cast Burst of Speed.
+ \
- Speak to Daraala again: 1x-
- Exit in the North East to Khoonda Plains towards the Crystal Cave.
+ \- Cast Burst of Speed.
\
- Speak to Saehde: 2,2,2,2
^ } Equip 2x Vibroswords.- Enter Kinrath Cave.
+ \- Cast Burst of Speed.
\
- Psuedo-Stim Set (We have Battle Stims now!) on your way to the Crystal Area.
- Cast Force Valor after Kreia accosts you: 4
> Use your level up for healing while fighting the Matriarch. If you need more health try to avoid using the Advanced Medpacs if you can.- Attack and kill only the Matriarch.
- Optional: You can try looting all 3 Crystal Formation’s, after defeating the Matriarch, for a chance to loot a Crystal, Nextor!
- There is also a chance for the Matriarch to have remains which may also contain a Crystal, Nextor also!
- If you do manage to loot a Crystal, Nextor you won’t have to do the shopping trip with Oondar!
- You may also loot some other decent crystals to upgrade your first lightsaber at the start of Dxun.
- Head back to where Vrook is captured by the Mercenaries: 1
- Cast Force Valor.
\
- Cast Burst of Speed.
\
- Defeat the Mercenaries.
- Vrook accosts you: 1x-
\
- Exit the Crystal Cave.
Defense of Khoonda
- Azkul talks to you: 1,2,1,4
- Cast Burst of Speed.
\
- Sell Atmospheric Sensors to Saedhe: 1x-
- Run back and enter Khoonda.
+ Speak to Suurlu to complete Farm Equipment quest: 1x-- Run towards Administrator Adare, she accosts you: 4
= Add T3-M4 to your party.- Speak to T3-M4: 3,2x-
- Run out to the right and through the final door where the droids are to get Akkere’s Hydrospanner.
- First Droid: 1,6
- Second Droid: 1,1,6
- We have to activate two droids, we get the Hydrospanner on the second droid no matter what droid it is.
\ Exit to Khoonda Plains. +- Cast Burst of Speed.
- Head around Khoonda to the right and click on the Security Door: 1
- Speak to Akkere: 5,1,1,1
\ \
- Wait until T3 speaks to you: 1x-
- Enter Khoonda.
- Cast Burst of Speed, go and speak to Zherron: 5,4,1
- Don’t mess these next 4-5 dialog choices up, or it will ruin your alignment and kill your run.
- Vrook and Zherron speak to you: 1,3
- Azkul speaks to you: 5,3
- Administrator Adare dies. :((
- Vrook thanks you for your help, kinda: 9
- Mouse spam through Vrook teaching you Ataru.
- Cast Burst of Speed and exit to Khoonda Plains to go back to the Ebon Hawk.
Visas
- Use 1x Strength Stim and 1x Battle Stim before entering the Ebon Hawk.
- Visas approaches you: 1
- Cast Burst of Speed as soon as you gain control.
- Attack Visas until she is at or below half HP.
- Following conversation: 1,1 -> 4,1 -> 1
- Cast Burst of Speed, run and speak to T3 to get more computer spikes: 6,2x-
- Head to the Galaxy Map and fly to Onderon. (3 left)
Dxun
Dxun Introduction
- Space Encounter: 2,3,4,4,1
- Cast Burst of Speed.
- Talk to Bao-Dur to make your Lightsaber: 4,4,2
- The Lightsaber dialog has a good chance to be ‘4,4,2,1’, so be prepared for that.
} Equip Lightsaber in Main Hand.} You could also equip a second lightsaber if you by chance have one at this point.
- Now would be a perfect time to upgrade your lightsaber(s) if you managed to loot any decent crystals on Dantooine, if you got a ‘Crystal, Nextor’, add that to your main lightsaber along with any other quick upgrades you can squeeze in.
- These lightsaber upgrades may lose you approximately 5 seconds here, but it will save some time with combat on Dxun.
- Access the Workbench: 2
- Exit Ebon Hawk choose Kreia and T3 for your party.
+ Kreia casts Burst of Speed.- Activate 1x Alacrity Stim.
- Force Jump and run your way to the Zhugs: 5
- Run to your right to go through to the Dxun Jungle.
- Mouse spam through dialog cutscene.
+
- Kreia casts Burst of Speed.
- Force Jump where you can and run through until the Mandalorians cut you off: 1x-
- Mandalore speaks to you: 3,1,3
- Immediately pause (spacebar)
+ \ \ (We should be T3 now.)
- Speak to Zuka: 1,1,1,1,3
- Fix the Broken Wires: 1
\ \
- Exit to Dxun Jungle.
Dxun Jungle
- Cast Burst of Speed.
+ \
- Follow along the path drawn on the map below as you make your way through this section:
- MC is Green.
- Kreia is Orange.
- Cannoks are Red X’s.
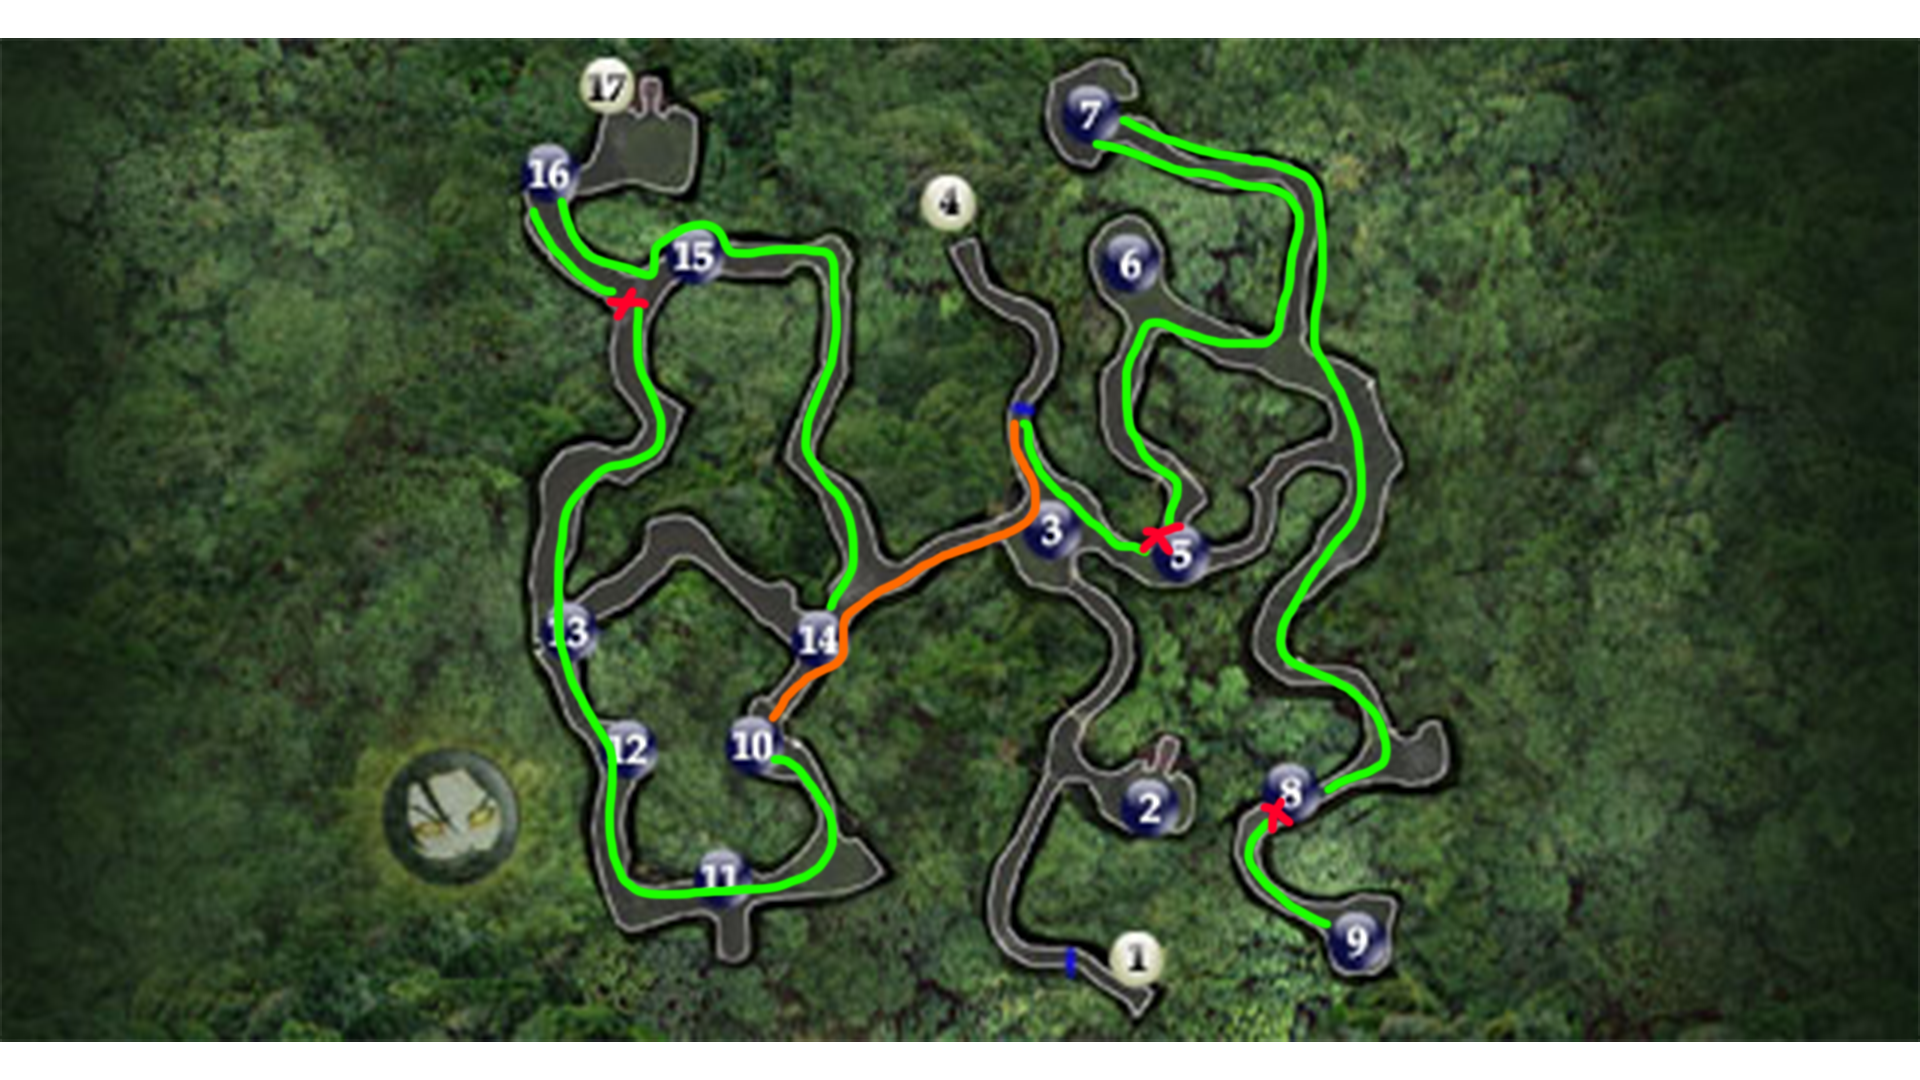
- Run to your left and cast Force Valor to kill the first Cannok at #5.
- Loot the Cannok.
- Don’t forget to loot the 3 Cannoks we kill for the Phase Pulse Converter parts.
- Continue along the path to #7 and you will come to where Kumus is.
- Approach the Permacrete Detonator, Kumus accosts you: 2,2,3,2
- Cast Force Valor and kill the 3 Young Bomas around the corner.
- Speak to Kumus.
- Swap to Kreia for casting Burst of Speed if you need it while running around the jungle. We want to save as much of our FP for Force Valor to fight the Zakkeg.
- Follow the path toward the second Cannok, #8, apply Psuedo-Stim Set on your way.
- Kill and loot Cannok.
- Continue to the Zakkeg at #9, cast Force Valor before attacking.
> Heal with your level up if needed, it is also best to try to save the Advanced Medpacs here if you can.- Loot the Zakkeg and the 2 corpses in this area.
\ \
- Run Kreia to Kelborn at #10: 1,3,5,1
- This switches Kreia and MC’s positions.
- Cast Burst of Speed.
\
- Follow the path towards #15, kill the scouts as you go.
- Heal MC with Medpac’s if needed.
- Kill all the scouts and continue to the third Cannok #15.
- Kill and loot third Cannok.
- Complete ‘An Explosive Situation’ Quest, go up the path to #16 and click on the Permacrete Detonator: 1
\ Exit to Mandalorian Ruins.\ Immediately turn 180° and exit back out to Dxun Jungle.+ Cast Knight Speed, run MC to #14 to find Kelborn: 1,1,4,3 \- Exit to Mandalorian Ruins.
Mandalorian Ruins
\ Cast Burst of Speed.- Speak to Mandalorian Guard Captain: 2,3
- Speak to Zuka 1,1,1,3
+ \
- Run and fix Telemetry computer.
- Cast Burst of Speed.
- Position Kreia next to Mandalorian Sergeant at Battle Circle.
\ \
- Run and talk to Mandalore: 1x-
- If these aren’t done in the correct order, or a conversation is completed wrong, it could ruin the credit route.
- Check if you have the Mandalorian Assault Rifle before continuing.
\ \ Speak to Zuka: 1x-- Speak to Xarga: 1x-
\ \
- Speak to Mandalorian Sergeant: 2,1
- Wait for Davrels name to be Red and cast Burst of Speed.
- Speak to Mandalorian Sergeant: 1
- Wait for Davrels name to be Red and cast Burst of Speed.
- Cast Burst of Speed.
} Equip Lightsaber and Vibrosword.
- } 2 Lightsabers if you have them!
Sith Ambush
- Run and speak to Mandalore: 1x-
= Click ‘OK’ when prompted with Party Selection screen.> Cast Knight Speed. +
- We can level up whenever we get them from here, or where ever suits you.
- Use Psuedo-Stim Set.
-
In this section, there are required Sith Assassin’s that need to be killed in order to progress the story to Onderon. These SA’s have low HP, and are never Stealth. There will be 2 high HP SA’s that you can leave alive.
- The files linked below, made by Lane(Thank you Lane!), are not to be used during a run! Your run will be invalid!
- Lane has made a couple files for the KotOR2 Override Folder, these change the required SA’s during the Sith Ambush to turn to Twi’Lek’s. This is super helpful for practice
- Simply download and drop the two files into your Override Folder in your game directory. Make sure to remove them before doing runs!
Sith_Ass_403
Sith_Ass_404

- Turn on solo mode and stim up, use Kreia for Force Speed then head to the green trigger from the image above. This will start the next part of this sequence.
- Enter the area where the red trigger is to spawn in the rest of the required SA’s.
- Place MC where Davrel is, level Kreia up for Force Valor (unless you have somewhere earlier in the run, or she doesn’t have a level up).
- If Kreia doesn’t have Valor or a level up, just cast Valor as MC.
- Set up Kreia and T3 to throw Grenades at the groups of SA’s surrounding MC.
- Once this group of SA’s are dead, head to the entrance, and kill any SA’s with low HP. Once it is only the 2 high HP SA’s remaining, try to just run the MC around or in and out of where the red trigger is, trying to stay out of combat too, eventually the game will progress the story to Onderon.
= Take Kreia with you, when prompted.
Onderon
Find Dhagon Ghent
- Mouse spam through Queen Talia cutscene.
- Mandalore accosts you: 1x-
- Cast Knight Speed.
- Run forward, Port Master accosts you: 1x-
- Onderon Soldiers accost you: 1x-
- Continue into Merchant Quarter.
+ Cast Knight Speed.- Head through to the two arguing aliens: 1,1,1,1,2
- Speak to Anda to your right: 1,1,2,1,5,1
- Speak to Captain Bostuco at the Sky Ramp: 2,2,1,1,1,2,1
- Head into the Western Square.
- Mouse spam through Rodian Mercenary’s dialog.
\ \
+ Cast Burst of Speed and run to Dhagon Ghents office: 1,1,1 \- Run back into the Merchant Quarter.
- Mouse spam through dialog cutscene of General Vaklu.
+ Cast Knight Speed.- Run and speak to Captain Riiken: 1x5,3
\
- Go back into the Western Square.
- Cast Burst of Speed, run through until you trigger the dialog with Twi’lek Bounty Hunter: 1
\
- Cast Knight Speed.
- Cast Force Valor. (or Knight Valor if you have levelled up.)
- Optional: Activate Energy Shield.
- Kill and loot Twi’lek Bounty Hunter for a Starport Visa.
- If you don’t loot him here, it will end your run.
- Make sure to keep all of your party members alive during this fight.
\ \ Run Kreia into Iziz Cantina.+ \ Cast Knight Speed.- Speak to Kiph: 1x-
- Talk to Nikko: 1x5, 3
\ \
- Exit to Western Square.
\ \
+ Run to the right and examine the Broken Droid. \- Enter Iziz Cantina.
+ \ Cast Knight Speed.- Run through past Kiph into the east room, speak to Panar twice: 1x- | 2,1,1,1
\ \
- Exit to Western Square.
\ \
+ Cast Knight Speed.- Talk to 1B-8D Merchant Droid, north of the Cantina Entrance: 1,1,1
- Talk to 1B-8D: 1
Buy:
- HK Droid Processor
Sell:
- Mandalorian Assault Rifle
\ Enter Iziz Cantina.\ Cast Knight Speed.- Talk to Kiph: 1x- -> 1x-
- Speak to Nikko: 1x- -> 1x- -> 1x-
- There is 3 different sets of dialog here, ending with Dhagon Ghent in his office.
- Cast Knight Speed, head into Iziz Cantina.
- Mouse spam Riiken cutscene of him patrolling Western Square.
+ Psuedo-Stim Set.- Cast Knight Valor.
- Speak to Bakkel: 1x-
- Set MC up to attack Bakkel.
\
- Position Kreia near Xaart.
\ \
- Loot Bakkel for Starport Visa.
\ \
- Speak to Xaart: 1x-
\ \
- Speak to Gormo on the way out: 1x-
- Exit to Western Square.
\ Cast Knight Speed.- Activate Energy Shield.
- Run towards the exit to Merchant Quarter.
- Here we are going to click on Captain Riiken as if to try and talk to him, but since we are in combat it won’t work. But now he won’t move from his position.
- Kill the enemies in this area and proceed to talk to Riiken: 2
- Kill Riiken.
- If someone sees your run is over.
- Exit to the Merchant Quarter.
+ Cast Knight Speed.- Run and speak to Anda.
\ \
- Head back into the Western Square.
\ \ Cast Knight Speed.- Run back to Dhagon Ghent and speak to him: 1x-
- Transits to meeting Master Kavar in Iziz Cantina.
- Kavar conversation: 1x- -> 1x-
- Cast Knight Speed, exit to Western Square.
Leave Onderon
+ Run and exit to Merchant Quarter.- Run forward, Onderon Soldier accosts you: 4
+ Cast Knight Speed, run towards exit to Iziz Spaceport.- Mouse spam through Onderon Solider cutscene.
- Get to the exit to Iziz Spaceport.
- Onderon Solider accosts you: Mouse spam
- Exit to Iziz Spaceport.
- Mandalore accosts you: Mouse spam
- Cast Knight Speed.
- Leave Onderon with the Mandalorian Shuttle: 1
- Mandalore speaks to you: 1
- Cast Knight Speed whenever it runs out
- Run and speak to Kex to shop: 1
Buy:
- 40 Advanced Medpacs
- 1x Hyper Battle
- 2x Hyper Strength
- 15x Alacrity
- 10x Stamina
- 10x Strength
- 13x Average Frag Mines
- Cast Knight Speed.
- Speak to the Mandalorian Guide: 1
- Turn 180° and enter the Ebon Hawk.
- Fly to Nar Shaddaa.
Nar Shaddaa 1
Landing Pad
- Atton says something about Nal Hutta: 5
- Watch/mouse spam Goto cutscene.
- 5,6 -> 7,7
= Select Kreia when prompted.+ Cast Knight Speed.- Head towards Tienn Tubb.
- Exchange Thugs: 4,2
- Continue towards the door ahead.
- Beggar accosts you: 1 -> 4
- Open the door, head around to the right.
- TT-32 accosts you: 3
- Talk to Tien Tubb: 1x5,2
- TT-32 accosts you as you are leaving: 1,1,1,2,3
- Cast Knight Speed.
- Run out into the quad, head slightly left and speak to Kodin: 1x-
- Proceed to speak to IT-31: 1x-
- Head into the swoop room behind Kodin.
- Talk to Borna Lys: 1x10, 2x-
- Cast Knight Speed.
- Go out through the door to the Swoop Droid C9-T9.
- Position MC next to the Interface Computer.
= Add T3 to Party.- Access the Interface Computer: 1x-
- Speak to Borna Lys.
- Head out the door and into the Docks to your left.
Docks Pt.1
- Cutscene of Hanharr and Vogga plays.
+ Cast Knight Speed. \ \- Run Kreia through and into the first door on the left. Go through the next door and open the first door in front of you.
- Activate Kreia’s Stealth, Default Hotkey: ‘G’, and walk into room. Mouse spam through conversation, then end Stealth.
- Exit the first room and continue to the second door on the right, only open the door. The Lunar Shadow Crewmen are in here but we will return here later as MC.
- Head into the last room on the right.
- Speak to Bith: 1x-
- Now exit this room and continue down the corridor, enter the first door on your left.
- Speak to Lasavou: 1x-
- Exit Lasavou’s room, enter the third door on the left.
- Speak to Lootra: 1,1,1,6
\
- Exit Docks to Landing pad.
Refugee Sector
- Cast Knight Speed.
- Run to the 2 Exchange Thugs hassling a Refugee: 3
+
- Head towards Refugee Sector.
- Kreia accosts you: 1x-
- Ratrin Vhek accosts you: 1x-
- Enter the Refugee Sector.
+ Cast Knight Speed, open the door.- Exchange Thugs accost you: 4,2
- Head through the door on the left and proceed down the 2 ramps, turn right and speak to Geriel: 1x- -> 1
- Continue through to Aiida and Hussef.
- Hussef: 1,4,1
- Aiida: 1,3
- Head back in the direction toward Geriel, but turn left heading away from him to find Nadaa.
- Speak to Nadaa: 1x-
- Continue along to Kahranna: 1,3,2,1,1
- Now we want to find the Serroco Leader, head through the big door past Odis.
- Serroco Thug accosts you: 1,1
- Head straight through 3 doors, then turn left.
- Walk up to the group of the Serroco containing the Serroco Leader: 3,1,1
- Now head back the way you came to Odis and speak to him: 1,3,1
- Head through the door next to Odis and up the ramp to the right, continue through to Saquesh.
- Before speaking to Saquesh, use Psuedo-Stim Set, Knight Speed and Knight Valor.
- Speak to Saquesh twice: 1,2,1,1 | 4
- Set MC up to fight Saquesh, then Auto Level Up Kreia and T3.
- Once Saquesh has been defeated, head out and turn right, follow the doors until you come across two Gamorrean Exchange Thugs. Kill these two.
- Make sure to keep T3 and Kreia alive here.
- Make sure to keep T3 and Kreia alive here.
- We need a Journal Entry to pop up before continuing so that the path is clear for Aiida.
- Once the two Gammoreans are killed, help Kreia and T3 with the last two if they need it.
- There shouldn’t be anymore than 4 that need to be killed for the path to be clear, just run around near the top of the ramp until the Journal Entry pops up.
- Head down and speak to Aiida: 1x-
\ \
- Exit as Kreia or MC, but switch to Kreia once back in Refugee Landing Pad.
- Exit to Landing Pad.
- As Kreia.
- Cast Burst of Speed.
- Mouse spam through cutscene of Red Eclipse.
- Run Kreia to Oondar.
+ \
- Party swaps can be reversed here.
- Run MC to Geeda and speak to her: 4
\ \
- Speak to Oondar: 1x-
\
- Speak to Geeda: 1x-, exit shop.
\ \
- Speak to Oondar twice: 1x-
- If you looted a Crystal, Nextor on Dantooine, just speak to him once and skip his shopping sequence.
\ Speak to Geeda: 1,3,1x-
Buy:
- Jal Shey Neophyte Armor
- Crystal, Opila
- Power Implant
\ \ Speak to Oondar for the last time: 1x-- Cast Burst of Speed.
- Bring Kreia to the door for Entertainment Promenade, but don’t click on the door yet!
= Remove Kreia from Party.= Add Atton to Party. \ \- Click on door to Entertainment Promenade, mouse spam through Twin Suns dialog.
Pazaak Den and Cantina
\ \ Cast Knight Speed.- Speak to Twik’Gar: 1x-
- Head towards the Pazaak Den, Door Guard accosts you: 3
- Talk to Geredi: 2,2
- Make sure Atton is in close range to Dahnis.
- Talk to Dahnis: 3
- Make sure T3 is in close range to S4-C8.
- Talk to S4-C8: 1x-
- The Champ enters: 1
- Cast Knight Speed.
- Talk to The Champ: 2,1
- Exit Pazaak Den and enter the Cantina.
- Speak to the Bartender: 1,1
- Walk towards dancers: 1x-
- Mouse spam until in control of MC again.
Docks Pt.2
- Cast Knight Speed.
- Click on the Watering Urn: 1
- Kath Hounds go sleepy time.
^ Bash open the door in the room Vogga is in. ^- Head out of where Vogga is, open the door on your left.
+ = Remove Atton from Party.= Add Kreia to Party.- Cast Knight Speed.
- Run ahead and speak to Fassa: 4,2,1x5,2,1x3
- Head in to Lasavou and speak to him: 1x-
- Now head back out to where Fassa is and use the Pylon Power Console: 4,1
- Run up the path to Pylon 2, enter the Pylon and use the Console: 2,1,2,1,1
- Cast Knight Speed.
\ \
- Run Kreia into Pylon 3 and loot the Twi’Lek Corpse to your left.
- Set Kreia up to fight the Cleaning Droid.
\
- Run MC to the Lunar Shadow Crewmen, speak to the one at the back: 1,3,1,1
- It can help Kreia to cast Knight Speed, Energy Resistance and Battle Meditation while you take MC to the Lunar Shadow Crewmen.
- Run MC to the exit to Landing Pad.
- Once Kreia has defeated the droid, exit to Landing Pad.
Red Eclipse
+ Cast Knight Speed.- Head to Ebon Hawk, Force Jump where applicable.
- Enter Ebon Hawk.
- Cast Knight Speed here if you have enough FP, if not use Kreia for Burst of Speed.
- Run into the Garage and access the Workbench: 2
- Proceed to add our 2 new Power Crystals to the Lightsaber and exit the Workbench. It is also a good idea to upgrade your second Lightsaber here while you are at it.
- Bring MC towards Cockpit until interrupted by the Red Eclipse Leader, Cahhmakt: 1x-
- Mouse spam through Ebon Hawk ‘onEnter’ cutscenes.
- Cast Knight Speed.
- If any of the following dialog is done incorrectly, it may result in an alignment total below 75, this will refuse us entry to the Sith Tomb and our run will end.
- Run and speak to Visas: 1,1,1,4,1,1,3
- OPTIONAL Incase you feel like you missed something in the alignment route, use the following dialog with Visas. If you do this and you cannot enter the Secret Tomb coming up, your run ends.
- Visas Optional: 1x6,4
- Fly to Korriban.
Korriban
Sith Academy
- If everything in the alignment route was completed correctly, we will have 75 alignment and we can enter the Sith Tomb.
- Landing cutscene: 3,2
- Cast Knight Speed.
- Make a hardsave here, quit, restart your game and load your save.
- Do not take any Party Members with you when exiting the Ebon Hawk.
- Mouse spam through quick cutscene.
- Cast Knight Speed.
- Try not to get too close to the Skeletal Corpses to avoid Kreia interrupting you.
- Head straight to the Sith Academy, cast Knight Speed after Kreia accosts you outside the Shyrack Cave.
- Enter the Sith Academy.
- After the initial Sion cutscene, cast Knight Speed and follow the map below:

- Follow the purple line, activate 1x Alacrity stim on your way and loot the Footlocker.
- If you get trapped by any Tuk’ata just hit them until they move.
- Follow the red line to the console at #2: 1,2,3,1,4,4,4,2,1,2,2
- Run through to #5 and activate the Computer Panel twice: 1 | 1,3,3,3
- Turn around and run into #6.
- Press 1, loot Master Vash’s body, then access the Computer Panel: 2,1,1,2
- Run back to the centre of the academy where you will find Darth Sion.
- Sion cuts you off: 5
- Cast Knight speed and run to the right (north) to exit the academy.
- We do not need to fight Sion here. We do this to complete the ‘Trapped’ Quest.
- Run and enter Shyrack Cave.
Secret Tomb
} Equip MC with Jal Shey Armor, Power Implant, Shield.
- It is optional to equip any gloves and belt here.
- Run / Force Jump to the Secret Tomb entrance.
- Enter the Tomb: 1
- *If Kreia tells you that you are not strong enough to enter the tomb, bring Visas into your party and do the following dialog options: 1x6,4 *
- If you still can’t enter, your run end here as you have made an error along the alignment route.
- Mouse spam where applicable, Malak speaks to you: 3
- We only have to defeat Malak here.
- Drop Malak’s jaw.
- Cast Knight Speed, continue straight and loot Severed-Arm holding Datapad.
^ Bash door. ^- Run past the Shyracks through to the next door.
- Mandalorian Battle ahead: 3,1,2
- Cast Knight Speed.
- Defeat all of the Mandalorians, some don’t need to reach 0 HP.
- Head through the next door, Force Jump to the Hssiss and take the right corridor.
^ Bash door, cast Knight Speed. ^- Loot the Dead Jedi, head back past the Hssiss to Kreia.
- Apathy is Death: 1,2,1 -> 1,1 -> 1 -> 2,2
- Defeat Kreia, cast Knight Speed and continue through the tomb.
- Open the next door, Revan: 1
- Defeat Darth Revan.
- Kreia accosts you: 5
- Cast Knight speed, exit to the Shyrack Cave and head straight back to the Ebon Hawk.
- T3 has a message from Kelborn: 1x-
} Unequip MC’s Lightsabers.} Equip Visas with MC’s Lightsabers, Energy Shield, Targeting Visor and Stealth Belt.- Fly to Dxun.
Dxun 2
Tomb of Freedon Nadd
- Exit the Ebon Hawk, take no one.
- Speak to the Mandalorian Guide: 2
- Make sure to get this dialog correct, or else you need to reload your autosave.
- Kelborn: 1,1,1,2,3,4,1,1
- This will select Visas as Party Leader, along with Mandalore and Disciple accompanying her. We want Mandalore and Disciple because they can soak up some hits for the end fight in the tomb.
- Manual Level Up Visas:
Level up 1.
- Skills: Recommended
- Feats: Improved Two-Weapon Fighting
- Powers: Burst of Speed
Level up 2.
- Attributes: Recommended
- Skills: Recommended
- Powers: Force Valor
Level up 3.
- Skills: Recommended
- Feats: Stealth Run
-
Powers: Knight Speed
- Auto-Level Up all 3 party members.
- The rest of the Freedon Nadd section is completed the same as the any% glitchless route.
+ Cast Knight Speed.- Xarga speaks to you: 1x-
- Run forward past the Boma’s until Xarga accosts you: 1x-
- Activate Stealth, (Default Hotkey ‘G’).
- Activate 1x Alacrity Stim.
- Run between the mines and through to the tomb.
- If you get spotted activate Visas’ shield. Heal if you need, Visas doesn’t have a lot of HP.
- Enter the tomb.
- Xarga catches up to you: 1x-
+ Cast Knight Speed and run forward to trigger a short cutscene to mouse spam through.- Activate Stealth and follow the map below:
- Run Visas through to #5, activating 1x Alacrity stim around half way.
- If Visas gets spotted just keep running and keep Visas healed as you can.
- Use the console at #5: 1,1
- It is possible to activate Stealth again here if you time it perfectly, I have only made it happen once but it is worth a shot each attempt you take.
- Run to #7 using Psuedo-Stim Set on the way, (excluding the Alacrity stim), keeping Visas healed as best as you can.
- Cast Knight Speed before triggering the dialog.
- Optional: Cast Force Valor for the fight.
- It is recommended to make a safety save here as this next fight sequence can be difficult.
- Triple Sith: 4
- Run immediately backwards to bring Mandalore and Disciple to the fight, set them up to fight the sith.
- Watch Visas’ health here, these Sith deal quite a lot of damage to her. Heal her with Advanced Medpacs often.
- Attack with Flurry until all Sith are defeated.
- Loot the Sith for the Sith Power Gauntlets.
} Unequip Visas of MC’s Lightsabers.- Try to run out of the area or speak to Xarga to trigger the end of the tomb.
- Xarga: 1
Onderon 2
Sky Ramp
- 1x-
= Take Atton with you.- 1x-
- Cast Knight Speed.
- Auto Level Up Kreia and Atton.
- Enter Sky Ramp
} Equip MC: Sith Power Gauntlets, Upgraded Lightsabers- Run through to the Palace, keep Knight Speed active as you go.
- Pro Tip: Using the Plasma Torch on the Force Fields is quicker than using your Lightsabers.
- After the first Force Field, if you hug the wall to the right, you can skip the trigger that causes Captain Bostuco to interrupt. Image below.

- It is recommended to make a safety save right before entering the Palace, the game is prone to crashing here.
- Enter the Palace.
Palace
- Mouse spam Captain Bostuco’s obvious realization that we have made it to the Palace.
- Run forward to trigger dialog with Colonel Tobin: 1,1
- Mouse spam until in control of MC.
+ Cast Knight Speed and take MC down the path to the right, facing away from the now closed door.- Head down to the second to last door on the right where Kavar will greet you.
- If you miss the first available Force Jump, where you land in a trigger of some info dialog, you can use the following image to walk around the trigger saving you ~1s.

- Kavar: 1x-
- Run in to Captain Kadron and speak to him.
- Captain Kadron: 1,1,3
- Cast Knight Speed.
} Unequip Plasma Torch. \
- Party swaps can be reversed.
} Equip Kreia with Plasma Torch and activate her Shield.- Take Kreia down the path to the left, opposite of which MC took, re-activate her Shield if you get too close to the Transformer that can explode.
- Mouse spam where cutscenes show up, keep Kreia healed as much as you can.
- Kreia can get stunned by the droids in the final room making it very dangerous, Kreia takes lots of damage quickly.
- Bash open the door.
} Unequip Plasma Torch.- Run around the right side and click on Kiph to talk to him.
- We immediately have to pause here (spacebar) after the last 1 as Kreia and MC switch places.
- Kiph: 1,1,1 (pause)
\ \
- Click on the console as MC.
- Console: 2,4
\ \
- Run Atton towards Tobin to trigger dialog, spam through it.
- When back in control of Atton, run him backwards to bring MC and Kreia in.
\
- Cast Knight Speed, activate 1x Strength Stim.
- Defeat the Drexyl Larva.
- Mouse spam fight cutscene: 2
- Cast Knight Speed
- Run forward into the throme room, mouse spam through Kavar killing Vaklu Soldiers.
- Run forward to Talia and Valku: 1x-
- Cast Knight Speed and kill Vaklu.
- Vaklu / Talia: 2,1 -> 1
- Speak to Kavar: 1x4, 3
- Mouse spam until in control of MC, then switch force form to Shien (1 up).
- Wait for load screen back to Jungle Landing on Dxun, cast Knight Speed as soon as you see MC.
- Visas speaks to you: 1x-
- Enter the Ebon Hawk.
- Upgrade Main Lightsaber using workbench. Replace Nextor Crystal with Pontite Crystal.
} Unequip MC’s Lightsabers.} Equip MC with standard Lightsaber for Force Jumps.} Equip Visas with MC’s Lightsabers.- Fly to Nar Shaddaa.
Nar Shaddaa 2
Bounty Hunter Truce
- Cast Knight Speed.
- Exit the Ebon Hawk, take no one.
- Run around to the back until the cutscene triggers: 1,2
- Once the cutscene/dialog ends, head to Tienn Tubb’s shop and speak to TT-32.
- Run to the entrance to the Docks.
- Atton stops you: 1x-
- Once in the Docks, run forward.
- Mira accosts to you: 1x-
- Mouse spam until in control of Atton.
- In order to defeat the Twin Suns we are going to Auto Level Up Atton and place 6 Frag Mines down where we are standing.
- Auto Level Up.
- Place 6 Frag Mines where you are standing, then run backwards against the bar to defeat the Twin Suns.
- Keep Atton healed as needed.
- Be careful with mouse spamming here on out as Nar Shaddaa likes to crash the game.
- Mira / MC: 1x-
- When in control of Mira, Auto Level Up and run though the Jekk’Jekk Tarr to the Private Lounge.
- If you have fast text here, make a hard save and quit/restart your game to prevent a softlock.
- Mouse spam through dialog, but once dialog ends DO NOT click your mouse until you see Zez-Kai Ell.
- If you mouse spam through the dialog with Zez-Kai Ell too quickly the door will not open from the room you are in causing the game to softlock.
- Cast Knight Speed.
- Speak to Lootra: 2,1
- Run into the room where the Bith was, the Bith Arm Holding Datapad is in there, to complete a quest.
- Head to and enter the Jekk’Jekk Tarr.
- Kreia teaches you ‘Breath Control’: 1x-
- Cast Knight Speed and run to the Jekk Jekk Tunnels in the back of the Private Lounge.
- Mouse Spam through Hahnharr and Visquis dialog, cast Knight Speed.
- Go straight through one door, turn left, run straight and click on the final door to trigger the next section with Mira.
- Mouse and 1 spam until in control of Mira.
} Equip Mira with a Shield and the Plasma Torch. Use 1x Alacrity Stim.- Plant 6 Frag Mines where you are standing and run backward to defeat Hahnharr.
- If Hahnharr doesn’t die you can just run him through one of the other Frag Mines in the arena.
- Kath hounds come out from behind the door.
- Loot the Beast Tender Corpse and Hahnharr’s remains for 6x Frag Mines.
- Head out to the Emergency Tunnel Control panel to escape: 1,1
- Wait for Visquis unskippable dialog to finish, once in control of MC, cast Knight Speed and run to the left to get to the arena.
- Open the arena door: 5,6 -> 1
Vogga’s Warehouse
- Mouse and 1 spam until in control of T3-M4.
- Be careful not to spam through transitions.
- Head into the Warehouse and speak to C7-E3: 1x4
- Then speak to C6-E3: 1x8
- Head back around to C7-E3 and plant 5 Frag Mines on them.
- Speak to C7-E3: 1,1 -> 1 -> 1
- You may have to run him into the Mines.
- Continue to the locked door: 4,5,2,1
- Entering the room triggers dialog with the droid inside: 1x-
- Head out of the Warehouse.
- HK-50’S accost you: 1x-
- Be ready to Auto Level Up T3 if the HK-50’s make any decent shots.
- Exit the Warehouse.
- Dialog with Atton and Mira: 1
- The second dialog set will ask Tien Tubb to change the Ebon Hawk’s Transponder Codes, then to choose two party members to travel to Goto’s Yacht. We choose to bring Mira and Visas.
- Tien Tubb: 1,1 -> 5,6
Goto’s Yacht
- Once on Goto’s Yacht, follow the map below for the fastest path:
- Make sure Visas stays cloaked for the first portion. If she gets detected it can be hard to continue. Consider making a safety save before performing these steps.
+ \ Auto Level Up,} Equip Ossus Keeper Robes.
3.cast Knight Speed then interact with the terminal: 1,4,2,2- Speak to the Utility Droid: 1
- Activate 1x Alacrity, then turn on Stealth (Default Hotkey: ‘G’).
- Follow the Blue line to the first Red X
- Activate Psuedo-Stim Set and Force Valor, open the door in front of you.
- Destroy the Maintenance Droid, followed by all 6 Turrets.
- Open the door to free MC
- Cast Knight Speed when in control of MC, run backwards to the console to get ‘Access Code - Power Distribution’: 1,3
\ Activate 1x Alacrity stim, activate Shield. Run Mira along the Orange line to #14.- Once you bash the door to the Bridge, bash the Plasteel Cylinder in the right corner for ‘Access Code - Droid Controller’.
- Access the Bridge Command Console at #15: 3,1,1,1,2,2,4,1,4,3,5
- Sometimes the previous selections don’t work, in that case it will likely be: 3,1,1,1,2,2,5,1,4,3,5.
- Head back to #14 and recover all 5 Deadly Frag Mines, which we will be using for a later fight.
- While Mira recovers mines, run MC to #1 (Green line).
- We will need to cast Knight Speed as MC.
- It takes between 4 and 5 seconds to recover 1 Mine.
} Unequip Mira’s Plasma Torch.- Access Primary Power System: 1,2,2,2
- Access Bridge Command Console: 1,5,3,5
\ \ Exit Goto’s Yacht.
Finish Nar Shaddaa
- G0-T0 on Ebon Hawk: 1x4
- Master Zez-Kai Ell: 1x4,3,1,1
- Mouse spam through Zez teaching you Juyo.
- Change Lightsaber Form from Shien to Juyo. (1 down)
- Cast Knight Speed and run to Fassa
= Add Kreia and Visas to the party. +- Run and speak to Vogga twice: 1x7,5 | 1
- Swap to Visas, party swaps may be reversed.
\ \ Talk to Fassa: 1,1,1} Unequip Lightsabers, Targetting Visor and Ossus Keeper Robes. \} Equip MC’s Lightsabers, Targetting Visor and Ossus Keeper Robes.
- New players can opt to keep the Jal Shey robes equipped for more Defense.
- Cast Knight Speed.
- Swap to Visas or Kreia, whatever one of them is first.
- Exit to Landing Pad.
+ \ Cast Knight Speed, run and talk to Geeda: 1x-- Exit Geeda’s wares.
- Head back to Ebon Hawk. Once inside, rebuild HK-47: 1x- -> 3,1x4,4,1
- Open Journal to show quests: (Default Hotkey ‘J’)
- At this point only the ‘Lost Jedi’ (Main Quest) should remain, if there are any others, something has been missed.
- Fly to Dantooine.
Jedi Masters
- The entirety of the run from here on out is almost (or even is) completely identical to the Any% Glitchless ‘endgame’ route, so if you already know that route you wont have to follow the guide from here. If not continue on.
Rebuilt Jedi Enclave
- Exit the Ebon Hawk, take no one.
- Cast Knight Speed and run to the Enclave Courtyard.
- Cast Knight Speed, run and enter the Rebuilt Jedi Enclave.
- Run straight ahead, mouse spam through dialog where applicable.
- Jedi Masters: 1x-
- Kreia / Jedi Masters: Mouse spam
- Cast Knight Speed, exit Rebuilt Jedi Enclave.
- Atton: 1,1,1,3,3
- Disciple: 5
Atris
- Mouse spam dialog where applicable.
- Once in control of MC cast Knight Speed and run to Atris’ chambers.
- Cast Force Enlightenment before entering.
- Atris: 5
- Defeat Atris, most times she is only 1 hit.
- Atris: 1x-
- Continue to spam until load screen.
Ravager
Telos
- Lt. Grenn: 1,1,1
+ Cast Knight Speed, run out.- Mandalore accosts you: 1
- Mouse spam Azkul’s quick dialog.
- Exit to 082 East.
+ Cast Knight Speed.- Run forward, TSF Officer accosts you: 1
- Run / Force Jump forward, exit to Entertainment Module 081.
+ Cast Knight Speed.- Run / Force Jump towards Dock Module 126.
- Mandalore and Visas: 1,1
= Click OK.- Cast Knight Speed.
- Head into where Lt. Grenn normally would have been and defeat the enemies in that room to complete the ‘Fuel Sabotage: Bonus Mission’ quest. This quest is unobtainable yet we can complete it, funny how broken this game can be.
- Run to Mandalore: 1
- Mouse spam Admiral Cede cutscene.
Ravager
- We can mouse spam once we see Visas.
- Mouse spam until in control of MC.
+ Cast Knight Speed.- Run through the Ravager following the map below for placing Proton Cores.
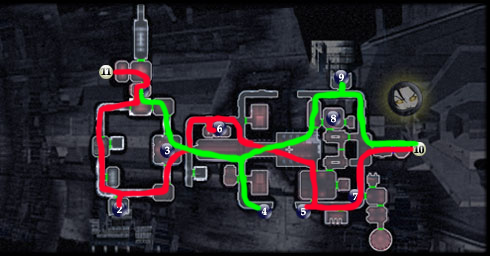
- The Green line represents our run to the Bridge to confront Nihilus:
- The Red line represents the final run through the Ravager. See: Ravager Final Run
- Run / Force Jump to #4: 1 -> 1
- Cast Knight Speed, run / Force Jump to #9: 1 -> 1
- Cast Knight Speed, run to #10 to enter the Bridge.
Nihilus
+ Cast Knight Speed.
- Keep a close eye on MC’s HP here.
- Run through the first door and then take the path to the left, Force Jump where applicable.
- Visas accosts you on arrival at the door to the Bridge: 1
- Enter the bridge and run to Nihilus, have Force Enlightenment selected in the Force Power Buff’s slot.
- Nihilus: 1x-
- Immediately pause when the dialog ends.
- Activate Psuedo-Stim set, cast Force Enlightenment.
- Auto Level Up Mandalore and Visas.
- Bring Nihilus’ HP below half.
- Visas / Nihilus: 1
- Immediately pause when the dialog ends.
- Activate Psuedo-Stim set, cast Force Enlightenment for the second time.
- Defeat Nihilus.
- It is very important to keep Visas’ HP up fairly high here as all Force Power Buffs will end once Nihilus is defeated. If her HP is low when the Buffs end, she will die for a split second causing the cutscene / dialog to not fire properly which is a glitch and will end your run here.
- Visas / Mandalore: 1x-
- Exit the Bridge via Turbolift to Command Deck.
Ravager Final Run
+ Cast Knight Speed, run to #5: 1 -> 1 -> Mouse spam- Cast Knight Speed, run / Force Jump to #6
- Access Missile Bay Control: 1,1,1,1
- Access Missile Bay: 1
- Cast Knight Speed, run to #2: 1 -> 1
- Cast Knight Speed, run to #11 to leave the Ravager: 1
- It is recommended to make a safety save before leaving as the game tends to crash here.
Malachor V
- Mouse spam through cutscene where applicable until in control of MC.
-
Cast Knight Speed.
- Follow the maps below. You’ll want to kill the Storm Beasts with Force Jumps while making your way through the area, this will make it safer for the Remote later.
- If they don’t die on first hit with a force jump then continue on and don’t worry about it, just be cautious when floating around as the Remote.
MC
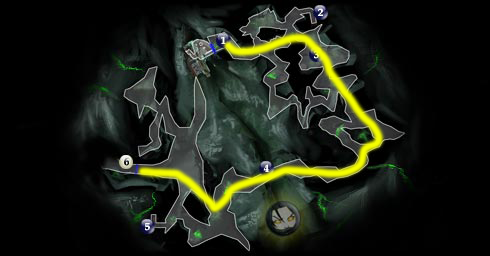
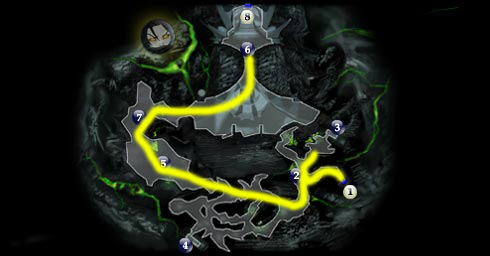
- In the second area, kill the 3 Storm Beasts near each other at #2.
- Kill 1 Storm Best near #3, this will help the Remote later.
- In the large area, marked with a #5, cast Knight Speed at the gate and walk through the edge of the rock on the right to perform Greater Storm Beast skip. Image and Video below for extra help.


- Head to the entrance to Trayus Academy.
Mira
- Plant all 5 Deadly Frag Mines, plus the 1 leftover Average Frag Mine and run Hanharr through them.
- Hanharr should die instantly, but if not then you can just launch grenades at him.
- Hanharr: 1,1,1
- Don’t click your mouse once the screen starts to fade black.
Remote
- Be careful, as you don’t have a lot of Repair Kits.
- All Damaged Console’s: 1,1
- Be careful not to get trapped in the third ship.
- Mouse spam through dialog where applicable.
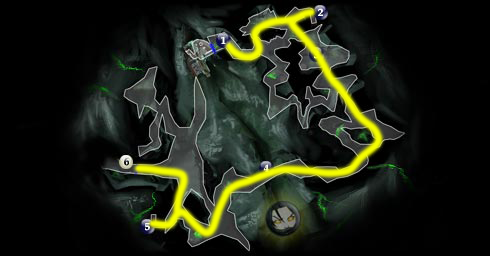
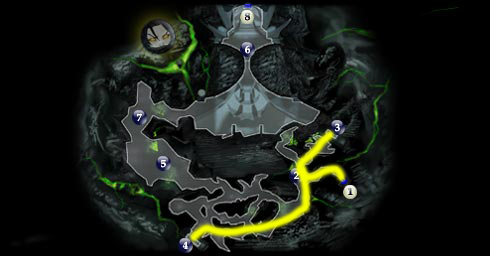
Trayus Academy
- Afterwards, you’ll be in the Trayus Academy as MC. Mouse spam dialog where applicable Follow the maps outlined below:
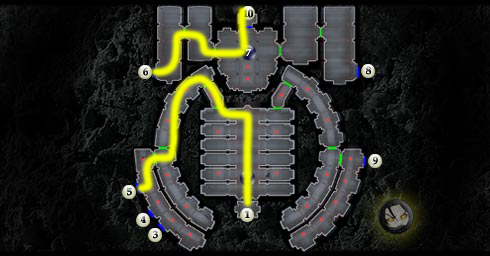
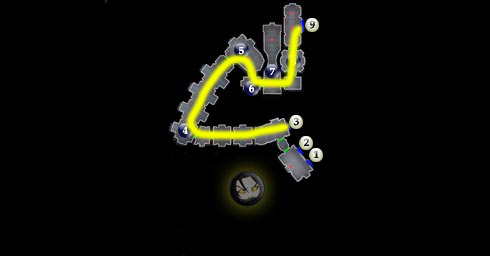
- You will be running through a lot of enemies in here, make sure to keep an eye on MC’s HP and heal as needed.
- Cast Knight Speed at the start of each new module that you enter.
- On entering the last module, the one where we meet Sion, activate your Hyper Stim set.
Sion
- Sion stops you: 8
- Cast Force Enlightenment
- You’ll need to bring Sion’s HP to 1 a total of 4 times.
- 1 spam through his dialog after each phase.
- Once he’s dead, head to the Trayus Core.
Traya
Version History
v2.3 (September 2025)
- Added new quest ‘Medical Bay Murders: Bonus Mission’ - previously believed to be glitched and / or fixed in TSLRCM.
- Updated ‘Peragus’ Route for ‘Medical Bay Murders’ Quest.
- Total quests for Czerka Route is now 105 Quests.
- Total quests for Ithorian Route is now 104 Quests.
v2.2 (May 2025)
- Updated Levelling Plan - Battle Meditation at Level 8.
- Updated Levelling Plan - Force Resistence at Level 11.
- Updated Levelling Plan - Improved Energy Resistance at Level 13.
- Updated Levelling Plan - Improved Battle Meditation at Level 14.
- Added skippable trigger on Telos Station when heading to Exchange. (Thanks to Glasnonck’s Walkmesh Visualiser, saves ~1s)
- Added Image embed for Trigger skip on Telos Station.
- Added a note to Dantooine Detailed Route - Trigger avoidance for spawning Gerevick in the Enclave Sublevel.
- Added Image embed for context on Gerevick trigger skip.
- Updated Sith Ambush notes.
- Added files for Sith Ambush Practice (Made by Lane)
- Added Image embed of trigger locations for Sith Ambush.
- Added skippable trigger on Sky Ramp after 1st Force Field. (Thanks to Glasnonck’s Walkmesh Visualiser, saves ~1s)
- Added Image embed for Sky Ramp trigger skip.
- Added skippable trigger in Palace, although it is circumstantial. (Thanks to Glasnonck’s Walkmesh Visualiser, saves ~1s)
- Added Image embed for Palace trigger skip.
- Added Greater Storm Beast skip! One final skippable trigger, in Malachor Depths. (Thanks to Glasnonck’s Walkmesh Visualiser, saves ~22s)
- Added Image and Video embed for Greater Storm Beast skip.
- Updated Sion and Traya fight sequences.
v2.1 (April 2024)
- Updated Alignment Route to be 75 at start of Korriban.
- Changed a sequence during Dxun Jungle to save ~10-15s.
- Removed Dialog with Kreia before Korriban.
- Credits Route and Shopping Trip updated for Dxun - Kex, now buying more Advanced Medpacs and Average Frag Mines.
- Average Frag Mines used on Twin Suns updated to 6 from 5.
- Average Frag Mines used on Hahnharr updated to 6 from 5.
- Added 1 Average Frag Mine to Malachor Hanharr fight.
- Added a change to Juyo Lightsaber Form from Shien after meeting with Zez-Kai Ell.
- Removed looting Freedon Nadd’s Lightsaber in exchange for the use of a second upgraded saber.
- Fixed backup dialog for Secret Tomb.
v2.0.1 (February 2024)
- Credits Route and Shopping Trip updated for Dantooine - Adum Larp, this is now the exact amount of stims needed before shopping with Kex on Dxun.
- Fixed a mistake with Dialog before the Sith Ambush on Dxun.
v2.0 (Some thanks extended to 30Cents, November 2023)
- Level Up notes for levels 2-9 added to Levelling Plan.
- Added looting Kreia’s corpse during the Prologue for the Locker Key.
- Added looting the Locker in the Cargo Hold for an extra Computer Spike.
- Updated ‘Prologue’ route.
- Updated ‘Fuel Depot - T3 Section’ route.
- Updated dialog with HK-50 on Peragus; giving us +2 LSP.
- Removed looting MC’s Armband on the Harbinger.
- Updated dialog during ‘Ebon Hawk to Telos’; giving us +1 LSP (+1 more than previous iteration).
- Added looting 3x Crystal Formation in Dantooine’s Crystal Cave.
- Added looting Kinrath Matriarch.
- There’s now a chance to loot ‘Crystal, Nextor’ in the Dantooine Crystal Cave, instead of purchasing one from Oondar on Nar Shaddaa.
- Added the option to upgrade lightsaber before the start of Dxun at the cost of ~5s but to potentially save a lot of time with combat.
- Visas now arriving at the end of Dantooine on 50 alignment point shifts.
- Alignment route updated due to Visas showing up at the end of Dantooine.
- Credits Route and Shopping Trip updated for Telos Station - Samhan Dobo.
- Credits Route and Shopping Trip updated for Telos Station - Dendis Dobo.
- Credits Route and Shopping Trip updated for Dantooine - Adum Larp.
- Added new Goto’s Yacht route found by Ninko (saves ~1 minute).
- Updated dialog for Endgame - Atris fight (saves 35 seconds).
- Updated dialog with Zuka at Mandalorian Ruins.
v1.7 (January 2023)
- Sped up Prologue by choosing to Skip the Prologue instead of using the Galaxy Map to select Peragus. (Thanks to 30cents)
v1.6 (November 2022)
- Added new quest ‘Fuel Sabotage: Bonus Mission’ that was unknown to the community.
- Total quests for Czerka Route is now 104 Quests.
- Total quests for Ithorian Route is now 103 Quests.
v1.5 (September 2022)
- Re-named to Max Quests Glitchless (due to the realization that Czerka and Ithorian routes on Telos have a different number of quests).
- Added 2 hidden Pazaak Quests which come from some dialog with Atton.
- Czerka Route made the main route for Telos Station with 103 Quests completed at end of run.
- Ithorian Route is now an option with 102 Quests completed at end of run.
- Updated the Wayward Captain quest’s route to be faster.
- Moved Korriban to after Nar Shaddaa 1.
- Updated the alignment route to be exactly 75 for the Sith Tomb on Korriban.
v1.0 (August 2022)
- (Formerly Named) All Quests Glitchless.
- 100 Total Quests in the (Ithorian) Route.
- Ithorian Route (later found to contain 1 less quest than Czerka Route (101 total quests).
- Korriban the last planet to be completed.
- Alignment route 76 for Sith Tomb on Korriban.


